Empxtrack payroll lite is an easy to use payroll processing system that helps SMEs to swiftly run payroll and disburse salaries on time. The payroll system helps to manage employee info, leave and attendance of the employees efficiently during the payroll processing and makes the job of payroll admin very easy.
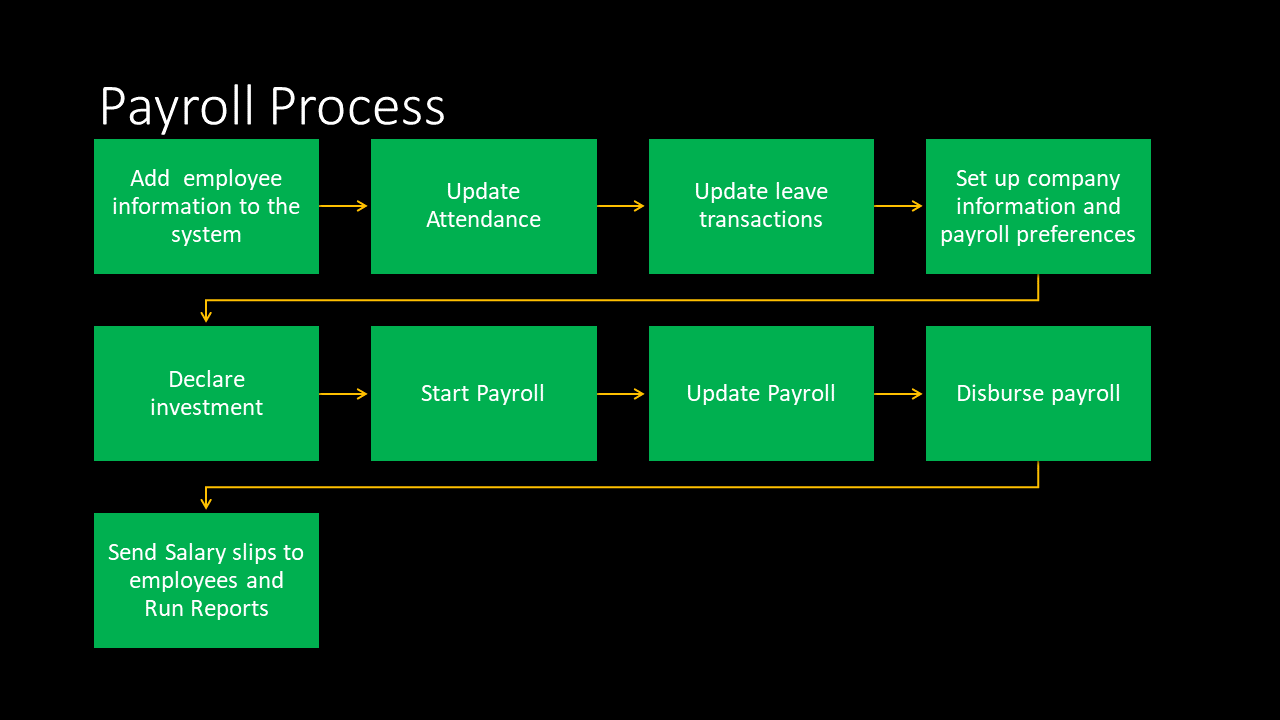
Table of Content
- Prerequisites to process payroll
- Initial Setup
- Process payroll
- Review Processed Payroll, make updates and reprocess payroll
- View and Download Reports
For HR & Admins
HR & admin can configure payroll, run payroll, adjust payroll, change salary, add employees for payroll calculation, view and download statutory reports and payroll reports.
Prerequisites to process payroll
1. Updated employee basic, employment and Salary information
2. Updated employee confidential id information
3. Updated Attendance
4. Updated Leaves
5. Updated Investment declaration for income tax purposes
6. Complete company information and payroll preference.
The system helps to verify and update all the above stated payroll prerequisites during the payroll run
Initial Setup
Add company details and setup payroll preferences
The company settings for payroll page allows a user to provide the company details required for statutory reports. This functionality is applicable to all Indian companies.
Note: The option to setup company information and financial details also appears in the payroll dashboard page of the application.
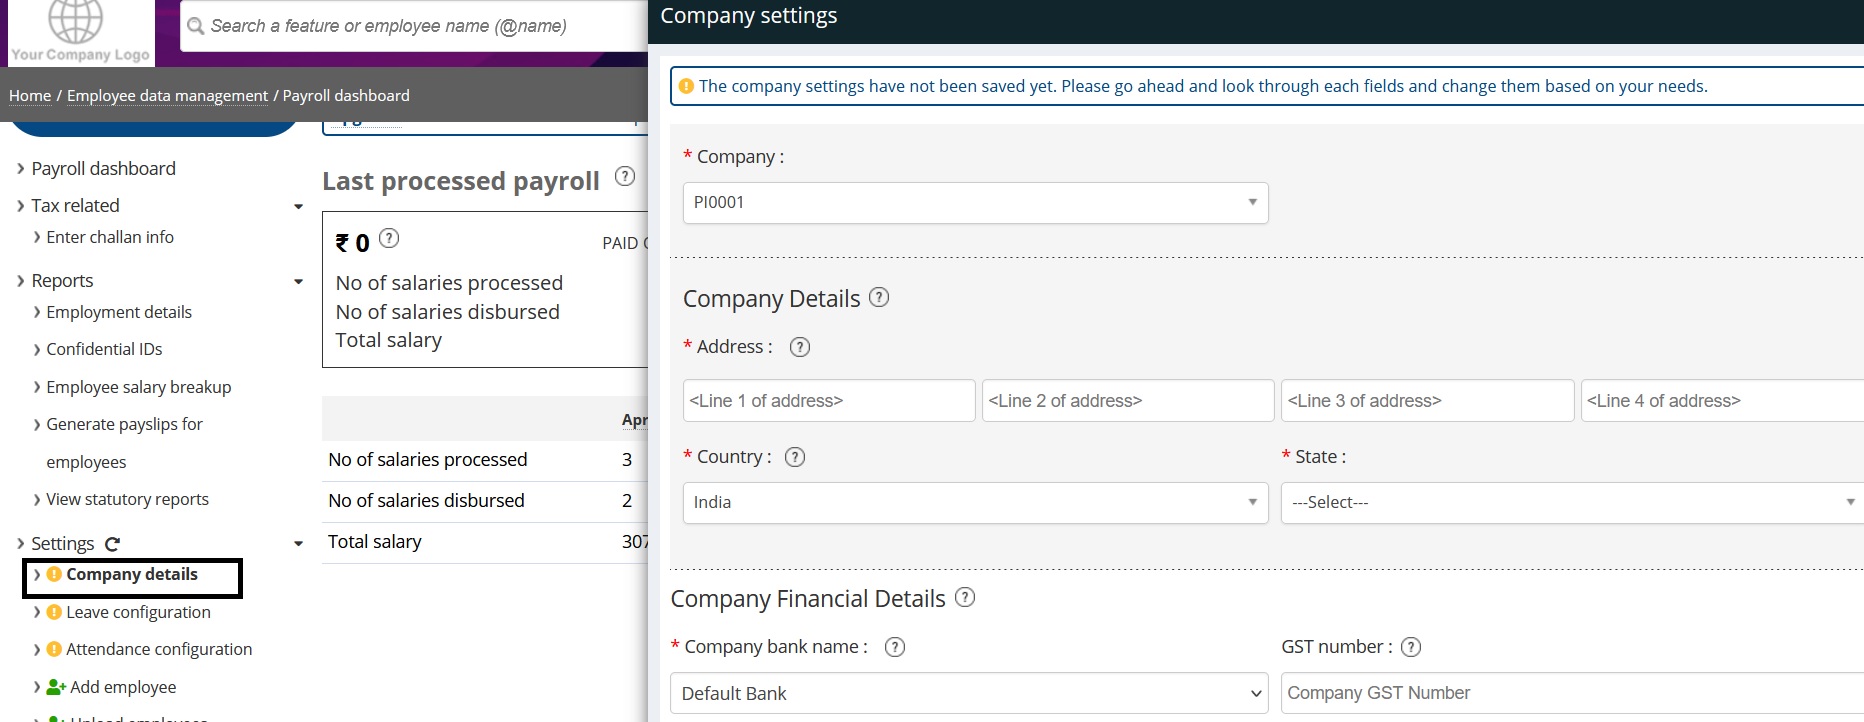
To add company details click on the “Add company details” option in the left hand menu bar on the payroll dashboard page as shown below
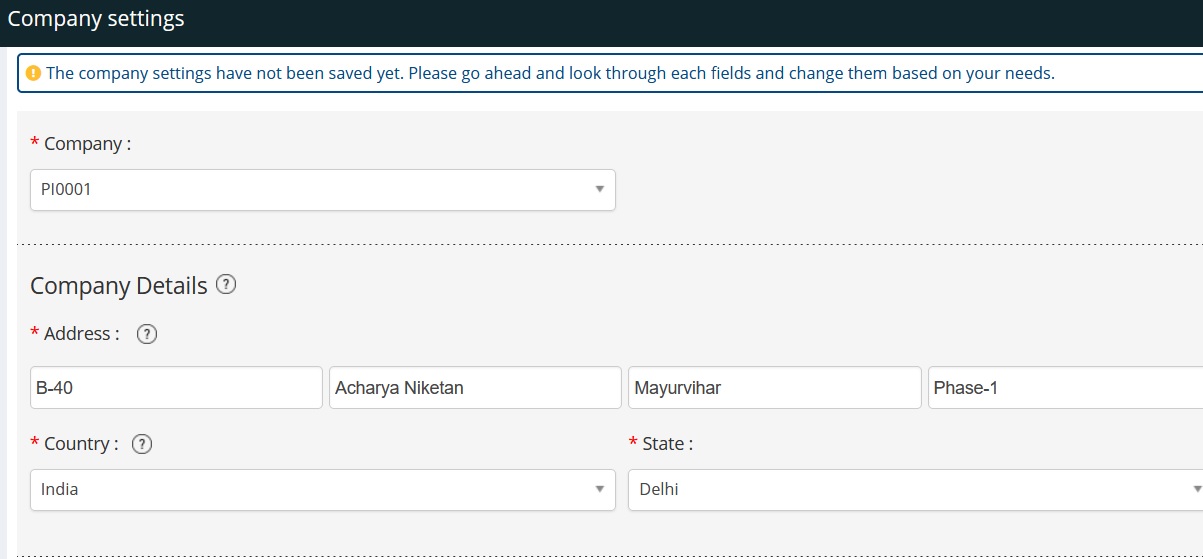
In the panel choose company name and fill the address details as shown below
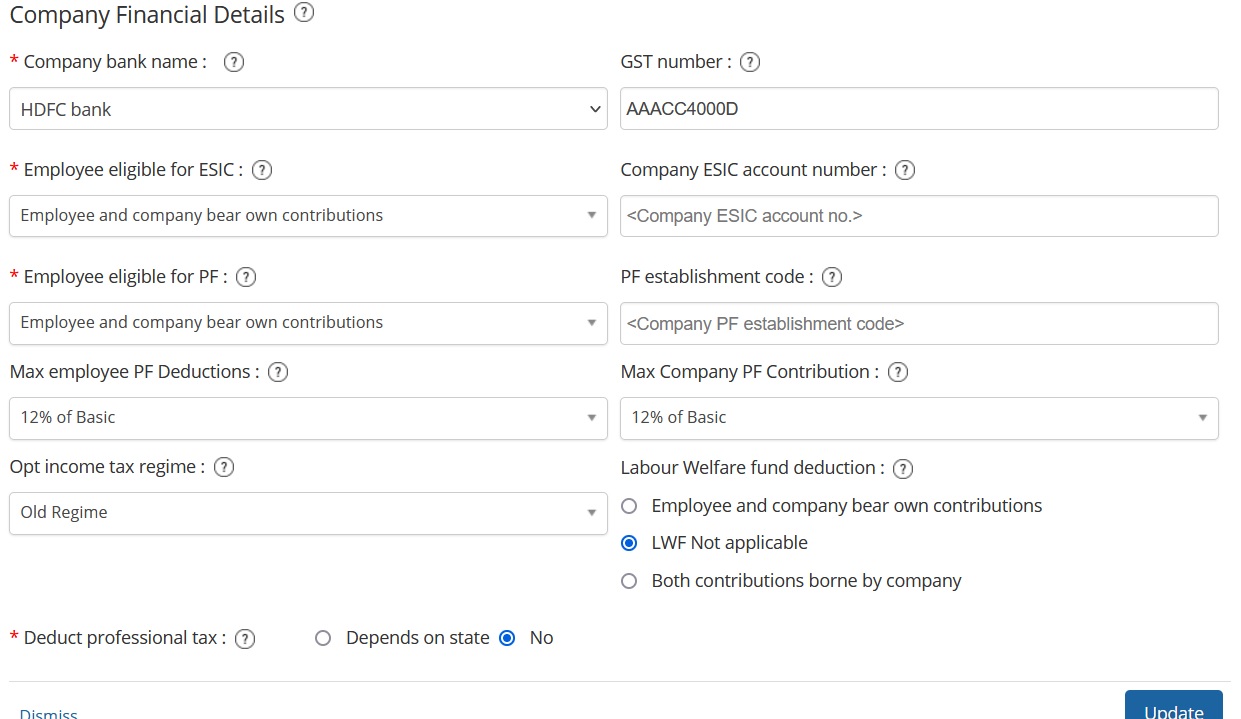
Provide the Company financial details and choose payroll preferences as shown below
Add employee information in Empxtrack Payroll Lite :
The system helps payroll admins to add employees and their particulars for the payroll calculations.
- To add an employee log in as HR manager click on the payroll module on home page. In payroll module click on the Add employee in the left hand menu bar and employee personal details and click on Next button.
 Figure:1
 - Add Employment details and click on the Next button
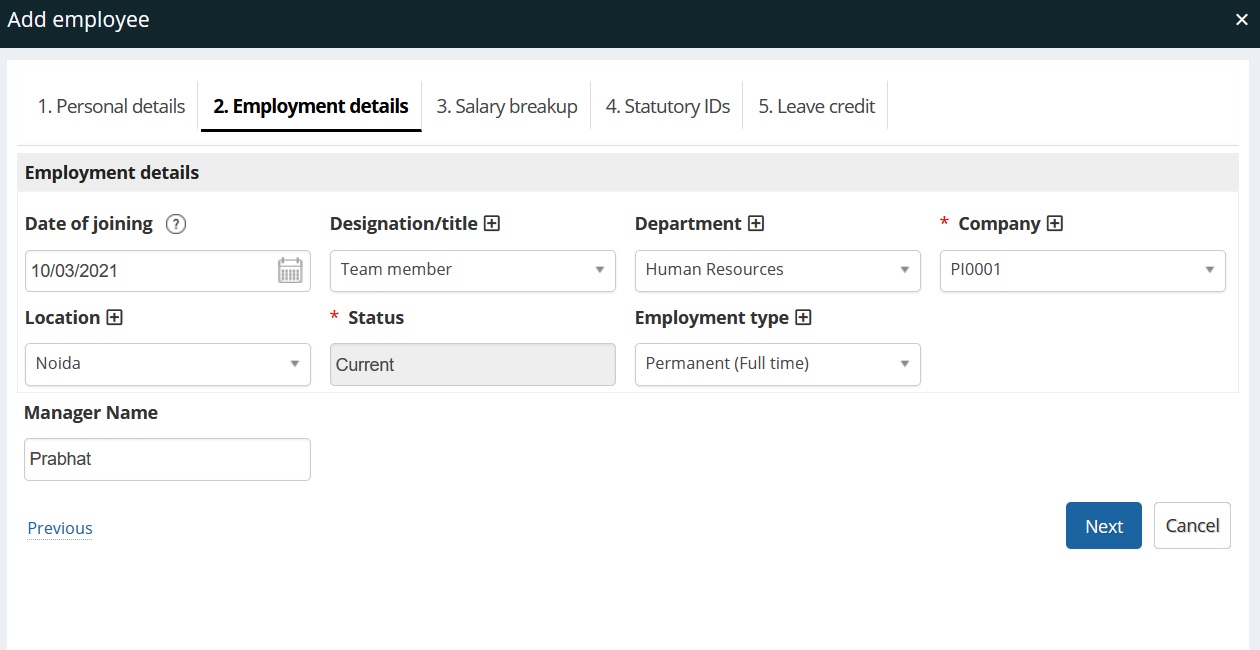
Figure:2
4. Provide Salary information in Annual or Monthly mode
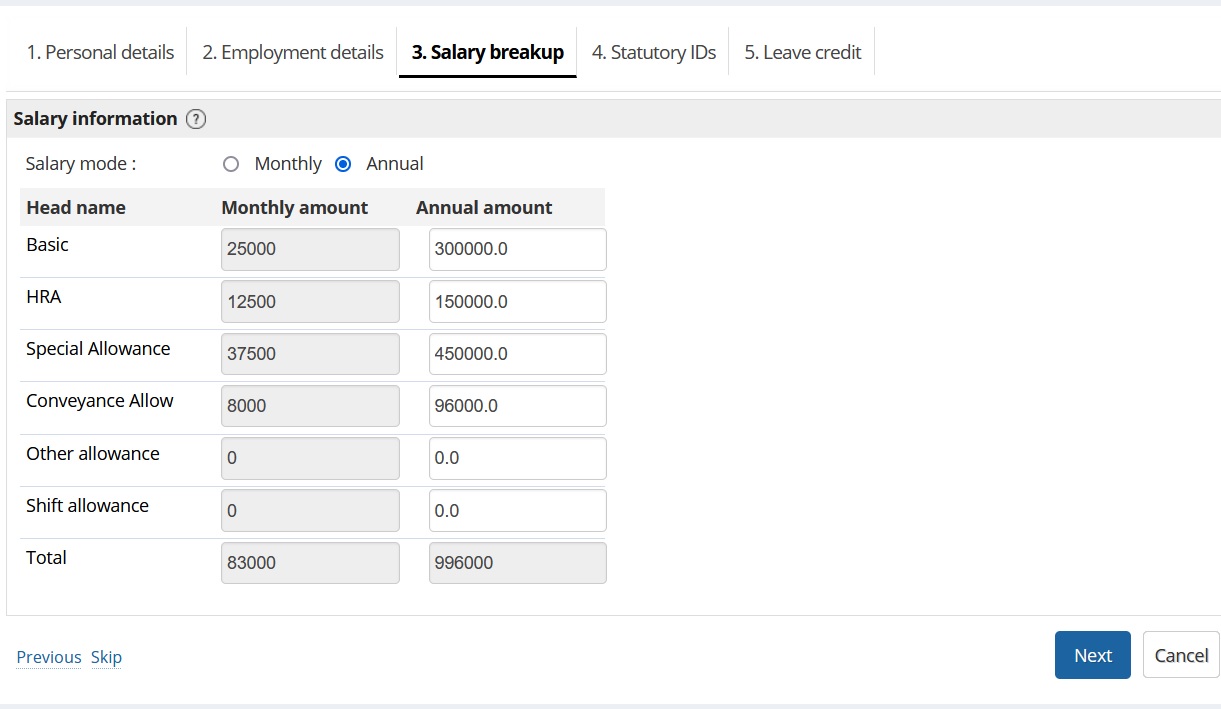
Figure:3
5. Provide the Statutory Ids information and select payroll preferences as shown below
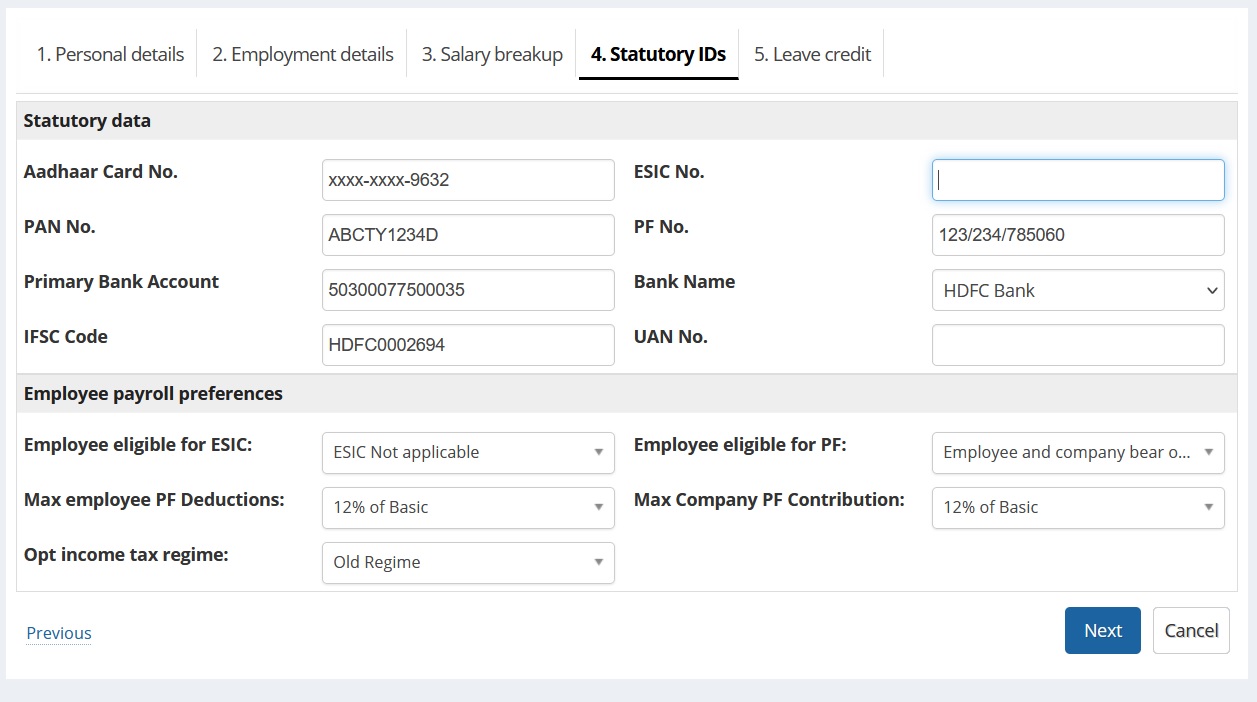
Figure: 4
6. Credit leave balance and click Confirm this will add the employee to the system as shown below
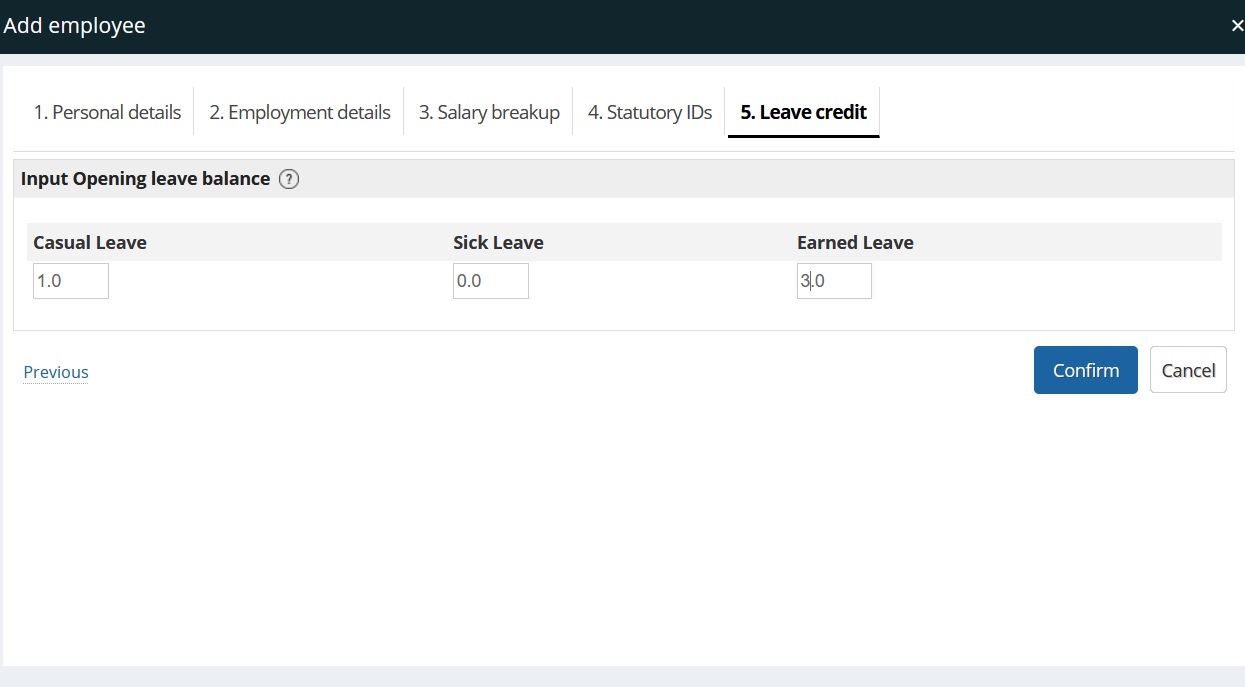
Figure:5
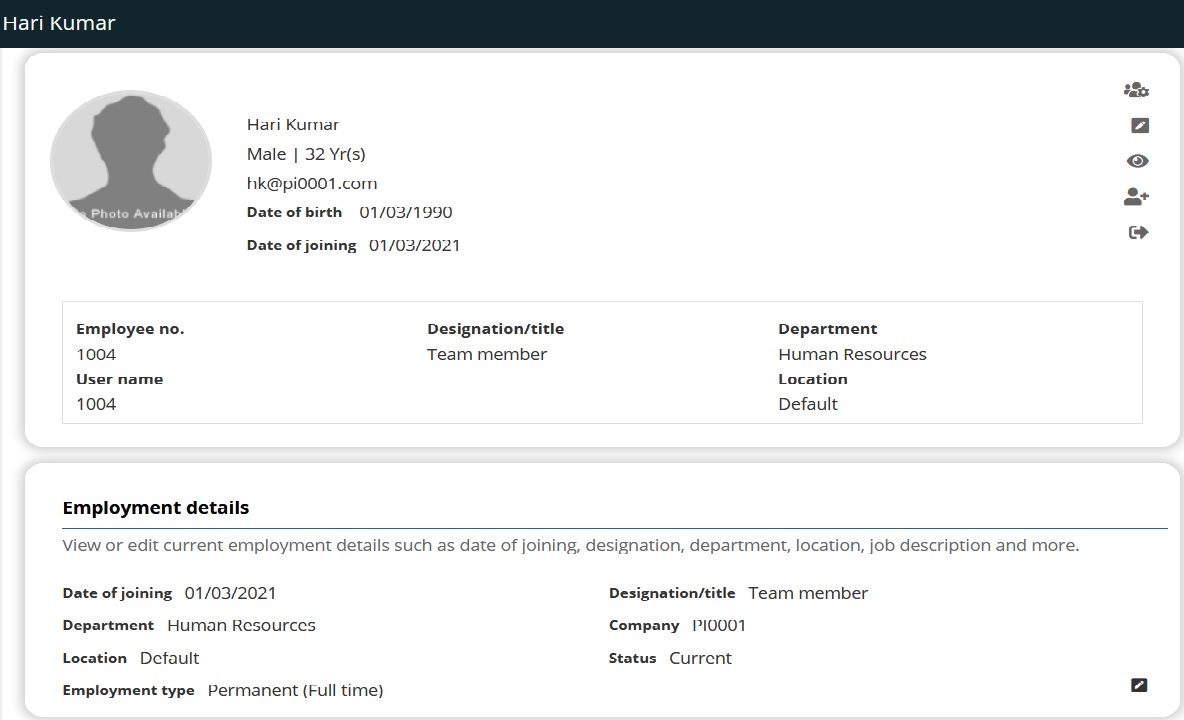
The employee profile looks as shown below
Process payroll
Once the employee gets added to the system the Payroll admin Clicks on Start payroll button in the Upcoming payroll section of the dashboard and system automatically calculates the payout of the employee for the respective month.
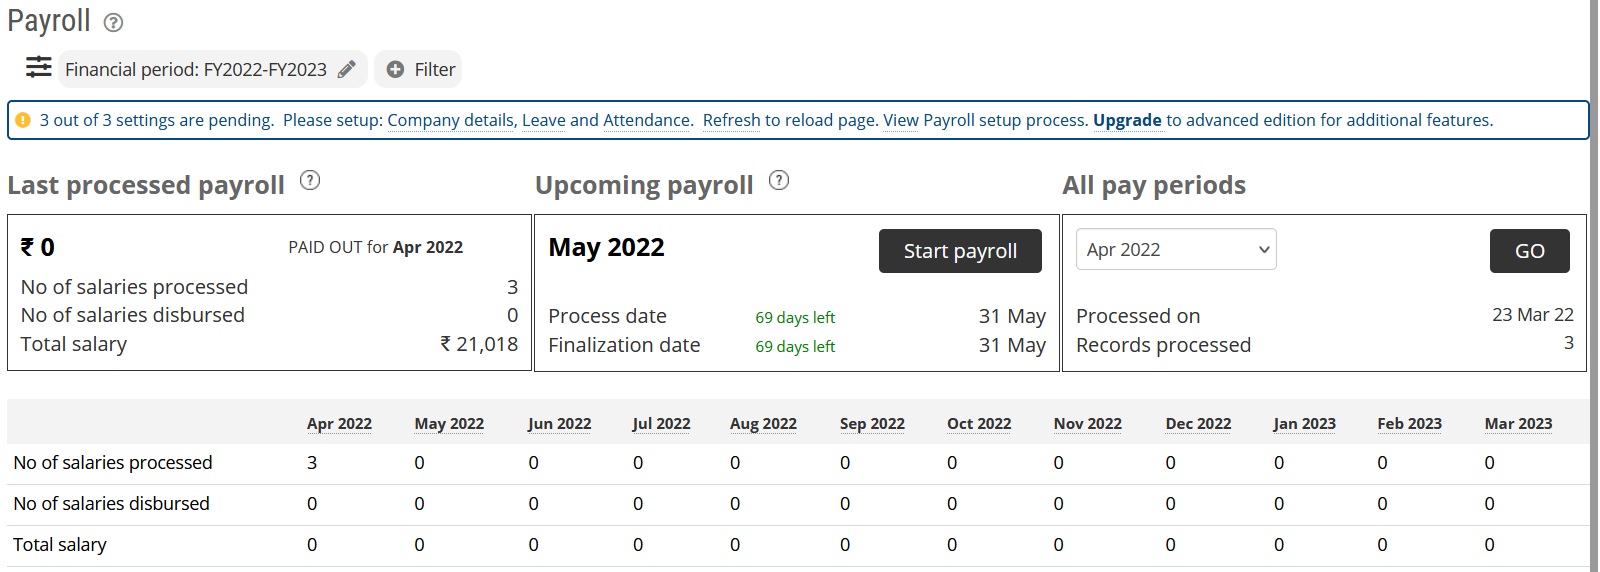
The Processed payroll dashboard looks as shown below and the payroll admin can review and update the Pending attendance, missing document and pending approval clicking the respective dashboard tabs and reprocess the payroll to finalize the calculations.

Review Processed Payroll, make updates and reprocess payroll:
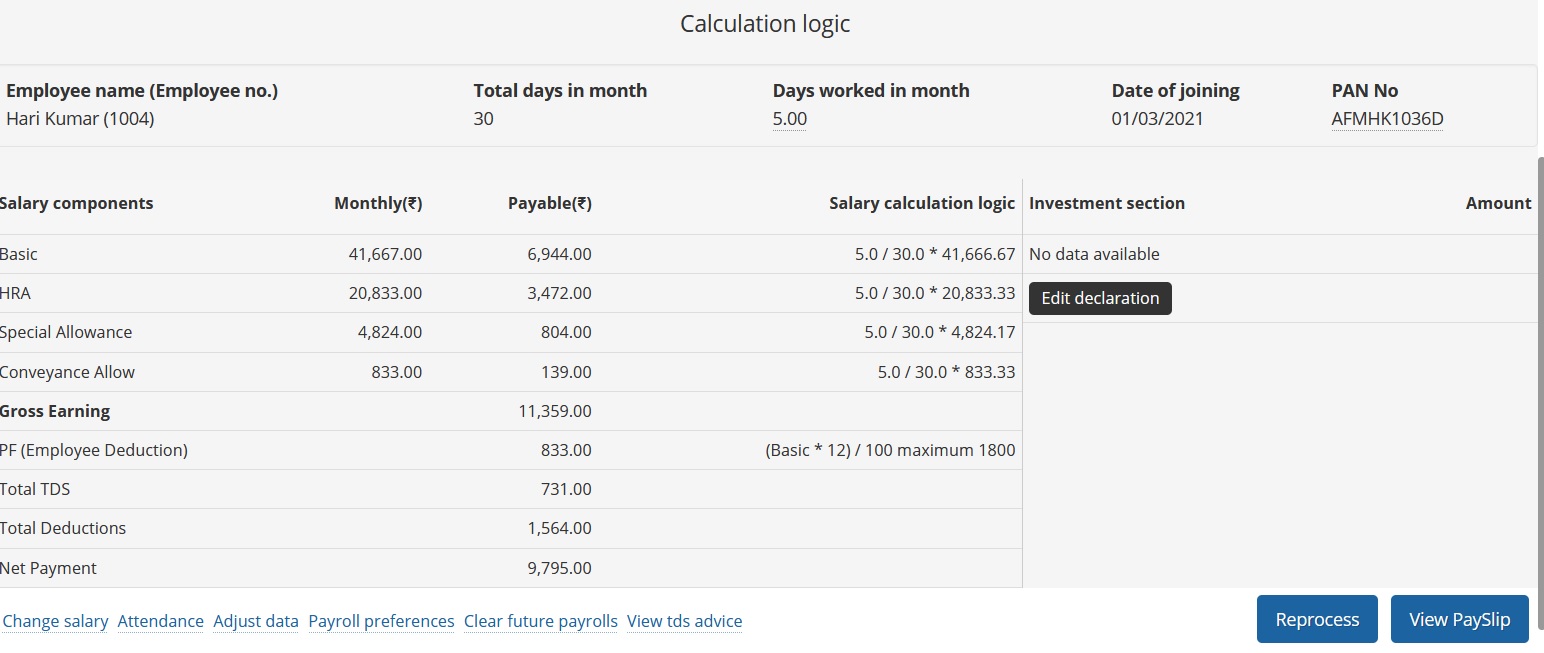
Payroll admin can review the processed payroll, view calculation logic and update the details like attendance , investment declaration, missing information and reprocess the payroll for the calculation changes.
To view the calculation based on existing details click on the three dots in front of the employee name

The details looks like as shown below
Manage/Update Attendance
To update attendance of an employee click on the view attendance link in the bottom of calculation logic details or on the number below Days worked in month header
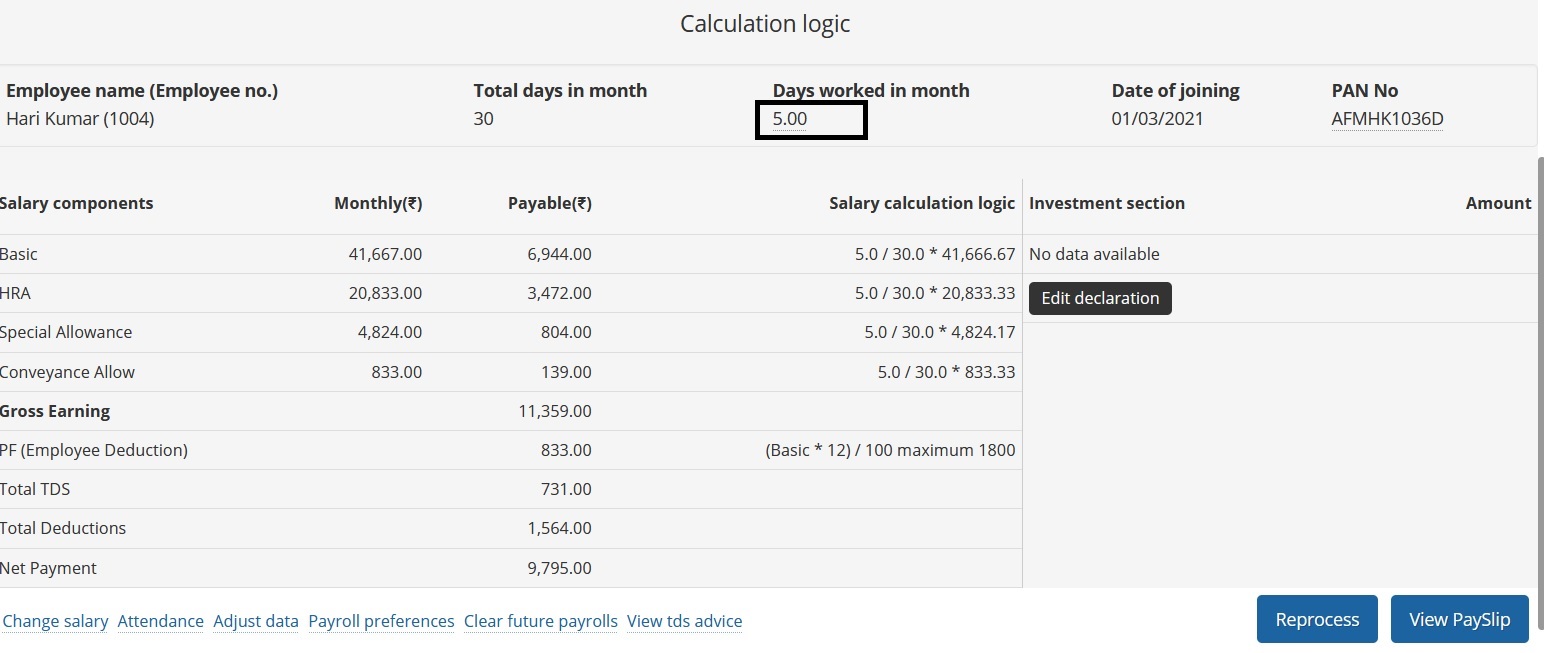
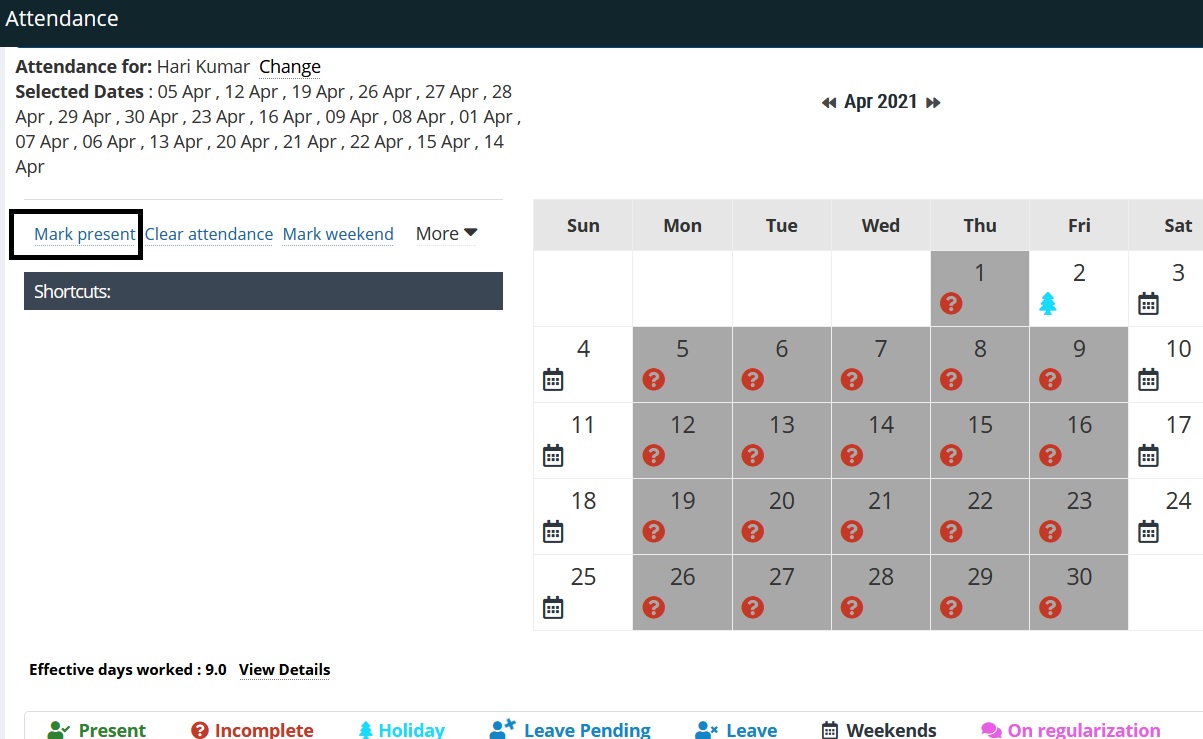
On the next page select the days needed to update and click on the mark present link to mark present Once the attendance gets updated click on the reprocess payroll to recalculate.
Update document&IDs
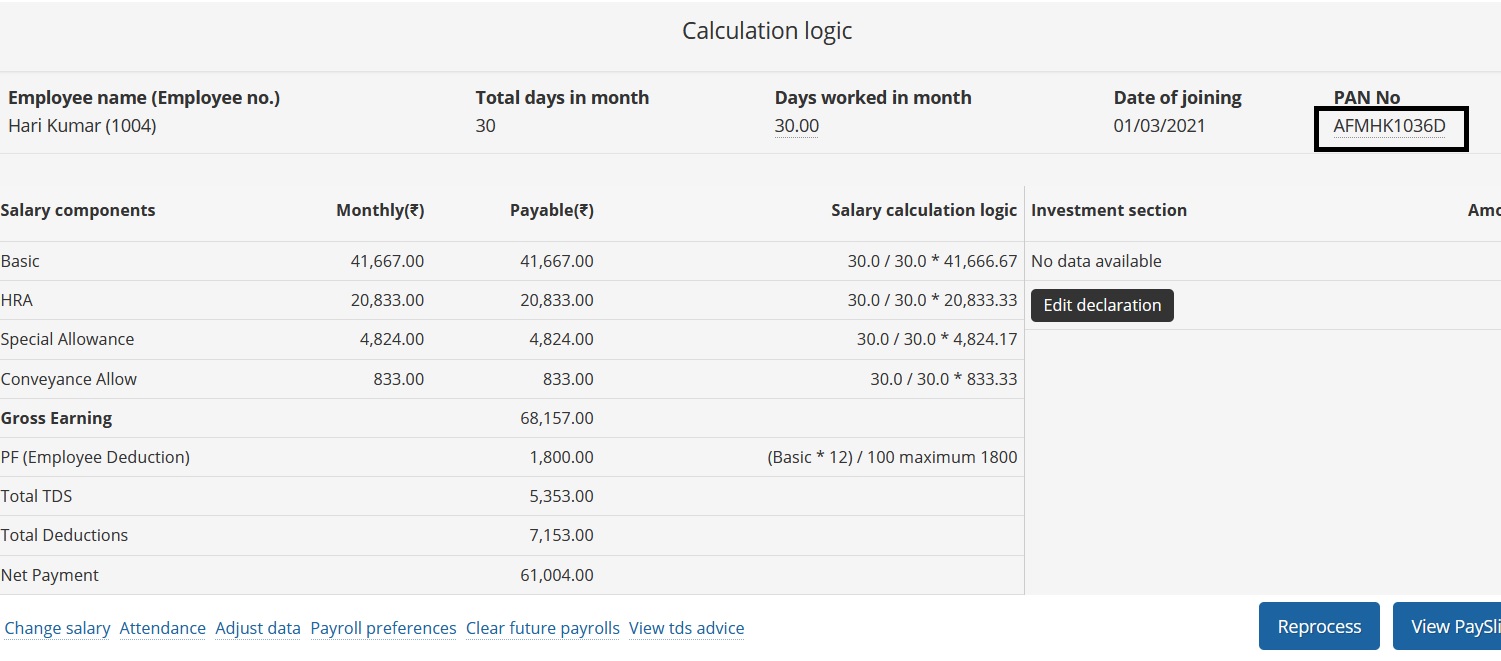
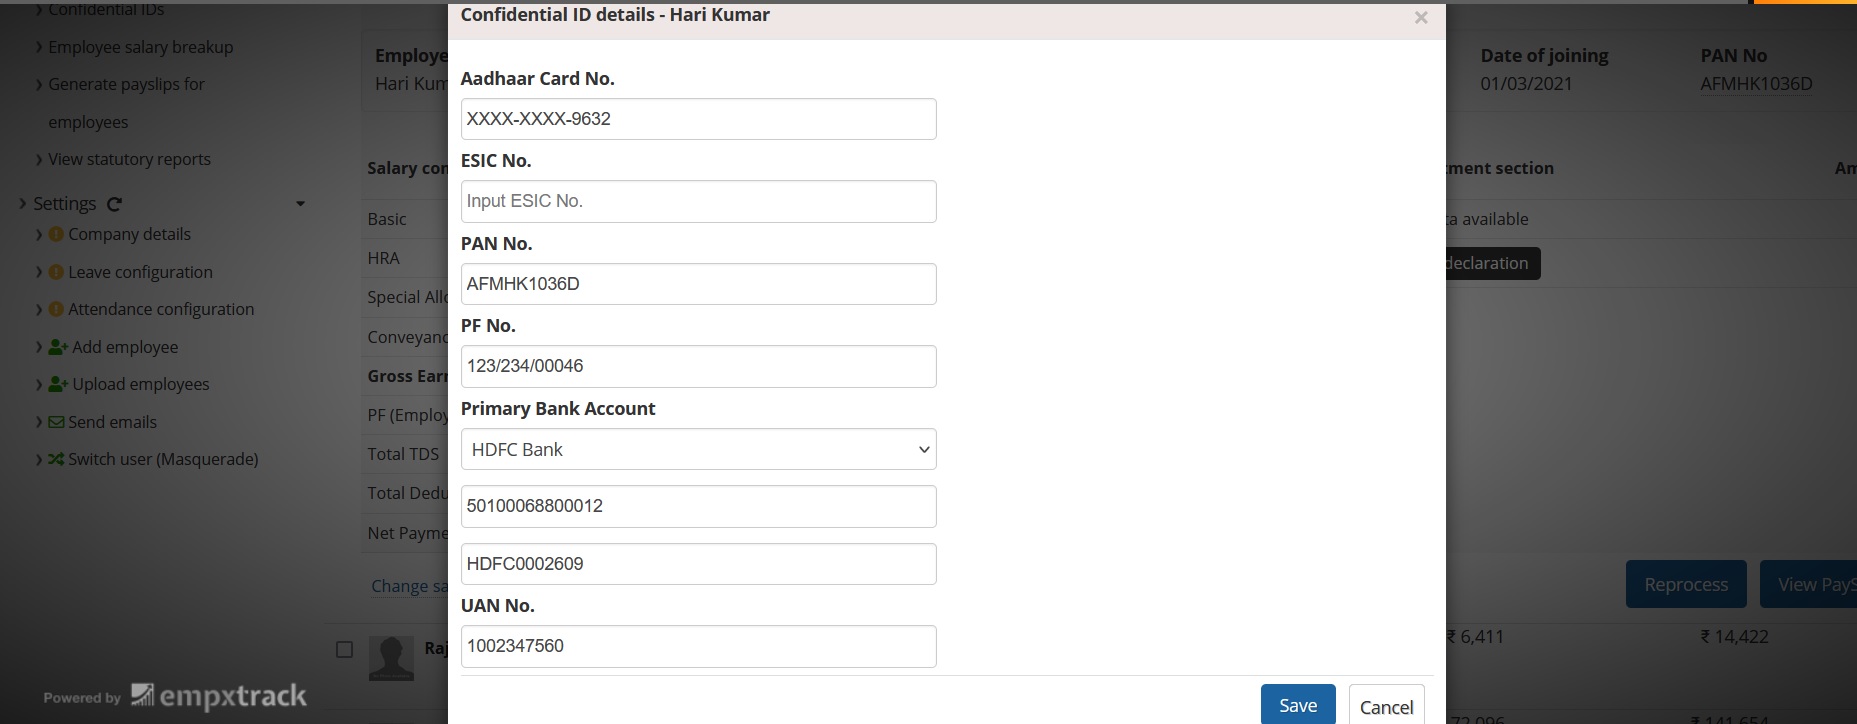
To update the missing Ids PAN No. etc. click on the Id name under header, update all the required information and click on reprocess payroll to include the information in the payroll.
Manage declarations
To manage investment declaration need to click on Edit declarations button as shown below and add declaration on the next page
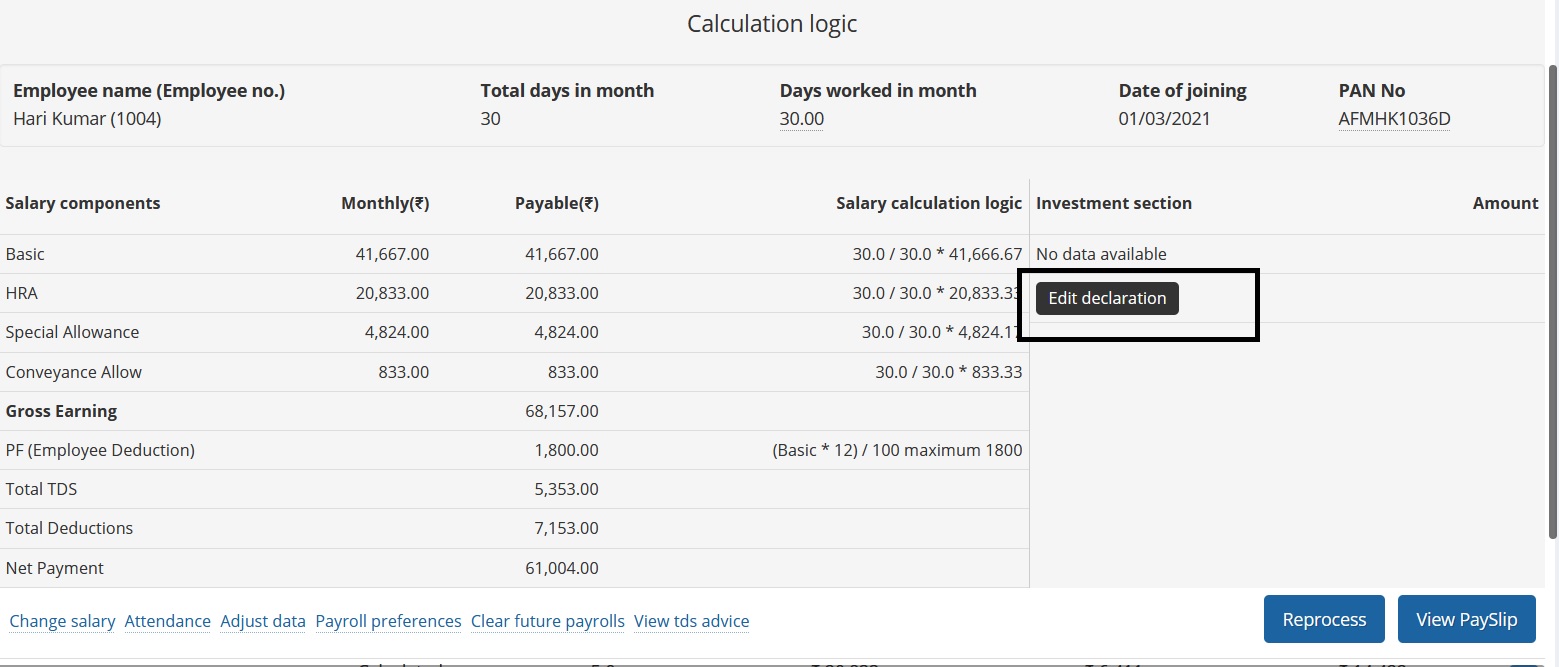
On the next screen you can copy declaration from the previous year or add declarations by clicking on Add more button
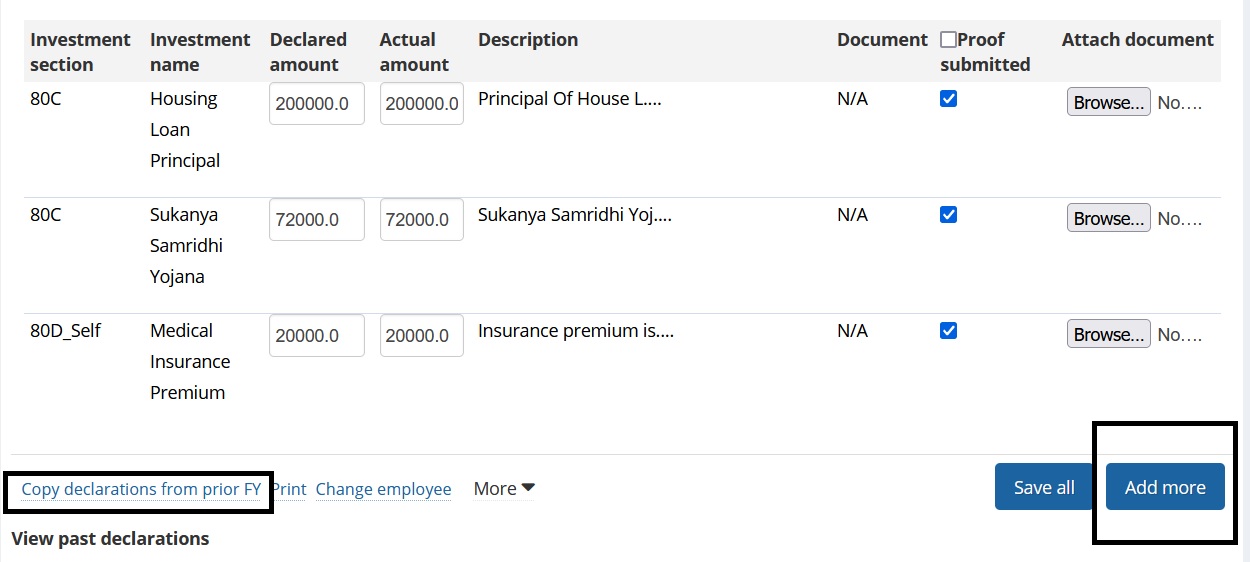
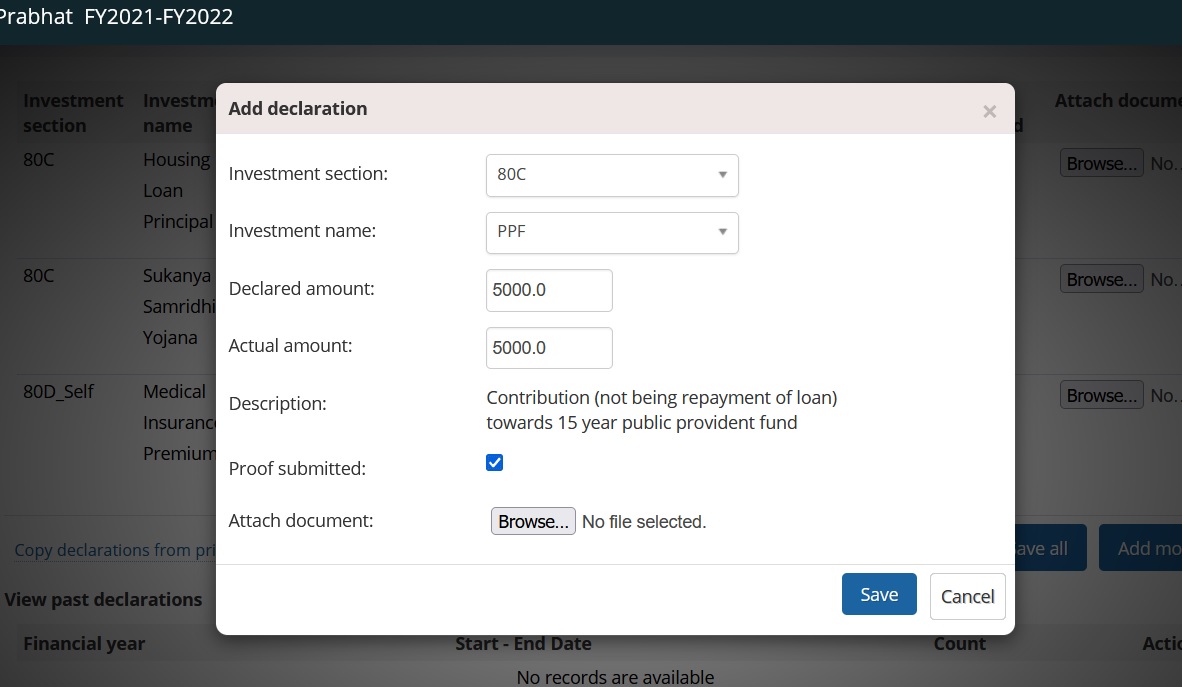
on next screen select the appropriate investments from the drop down and click on save button to save the investment. Post declaration of investment reprocess the payroll.
Update Salary Structure:
To change/Update salary structure click on the click on the change salary structure link in the bottom of calculation logic as shown below
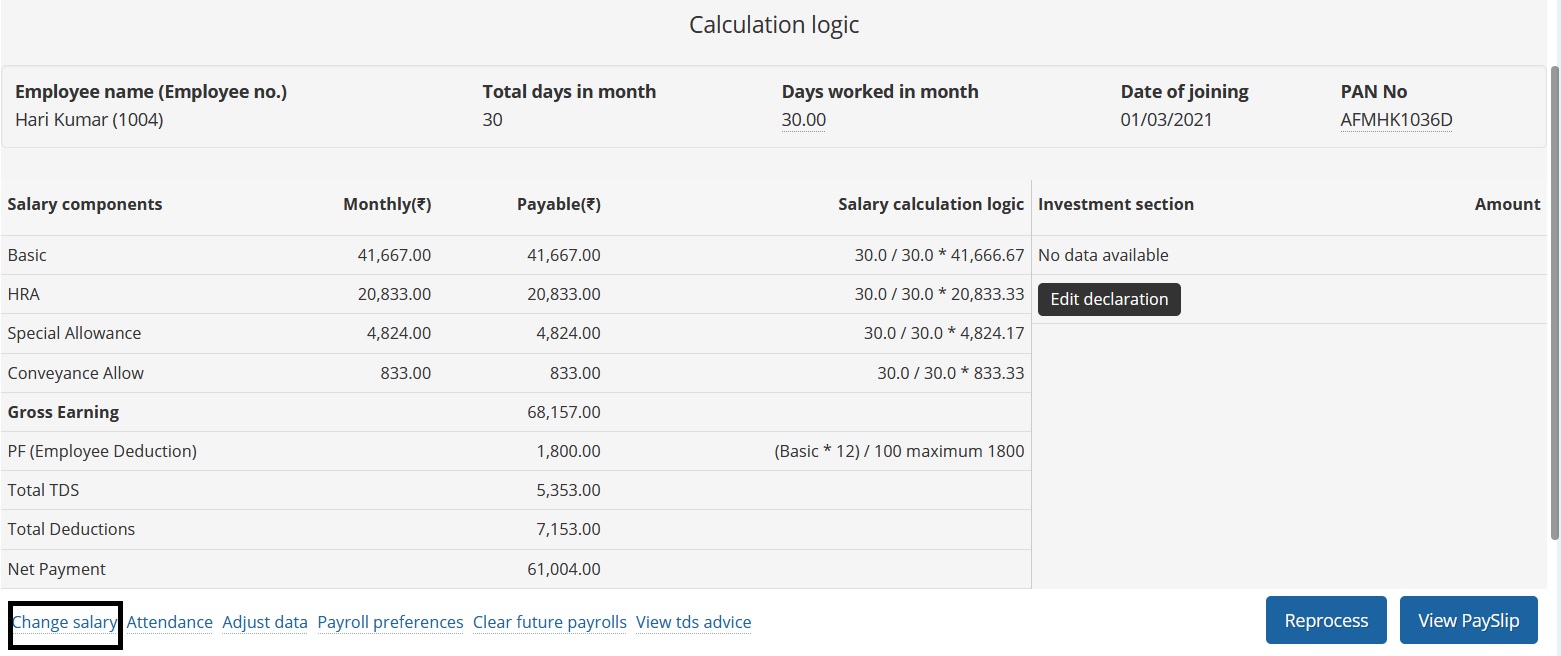
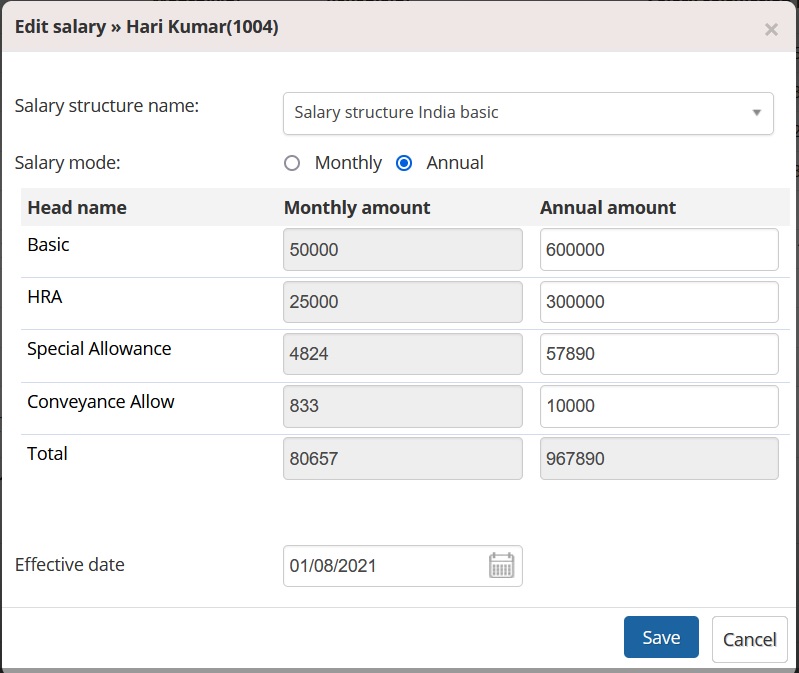
On the next screen provide the new salary details in monthly/Yearly mode, select proper effective date and click on save
Adjust data in Empxtrack Payroll Lite:
Sometimes you need to add extra payout to the employees or change the number of days worked in the month after payroll calculation for this click on adjust data link in the bottom of calculation logic section and update the attendance data or provide extra payout information.
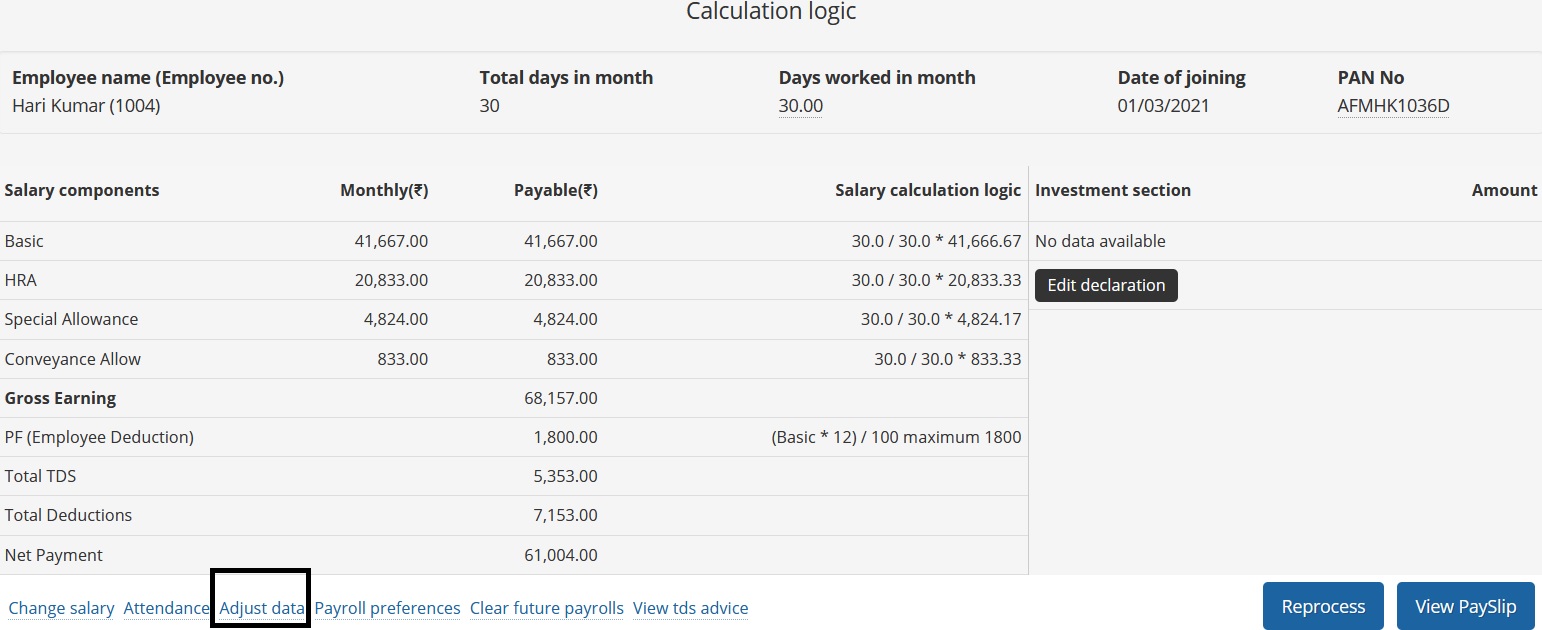
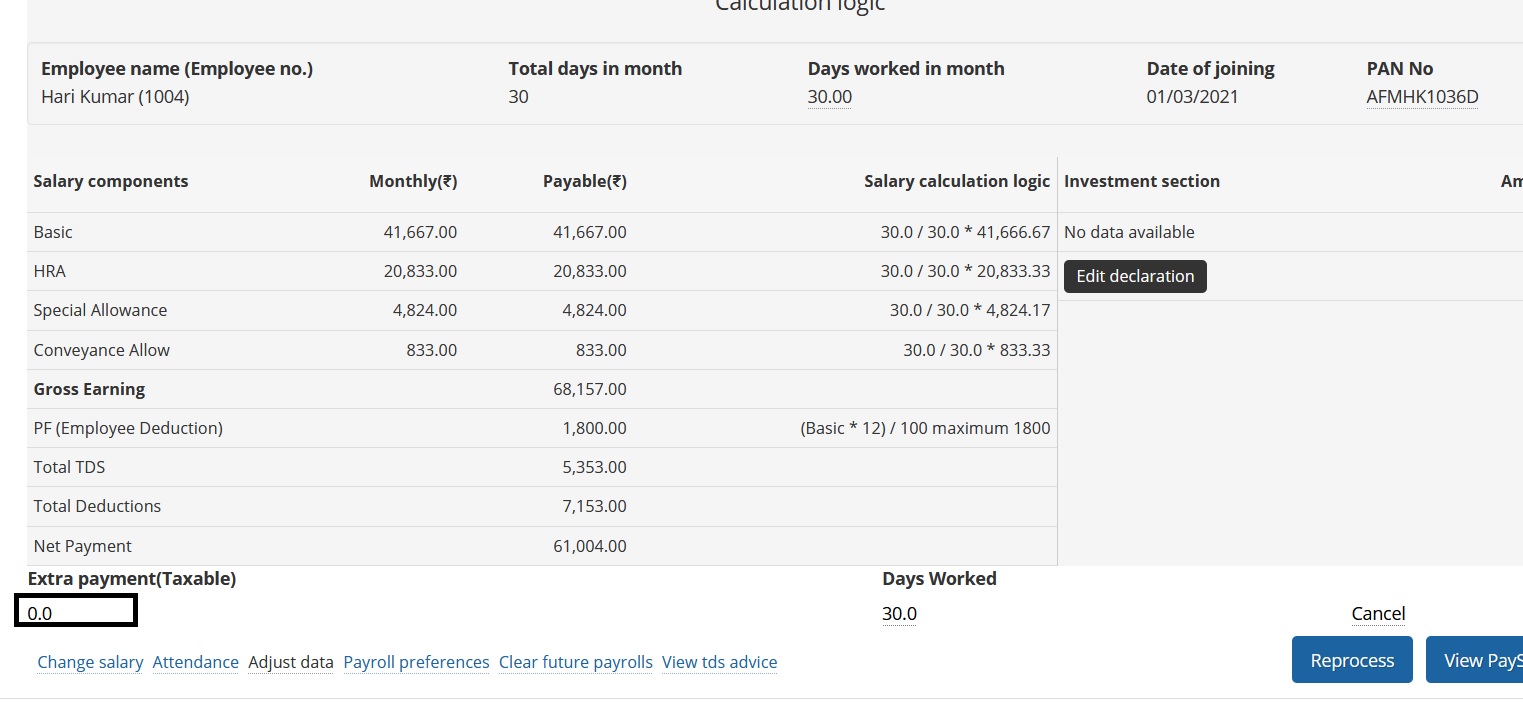
To add extra payment click on the numerical figure just below the Extra payment header as shown below
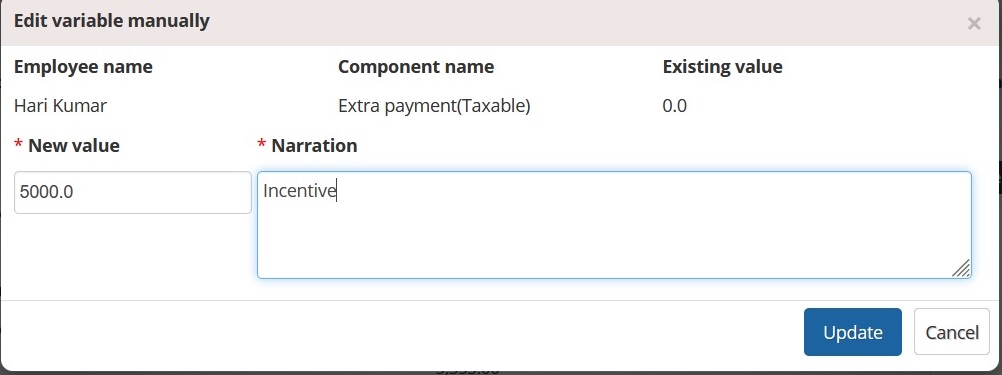
On next screen the click on the payout information followed by update.
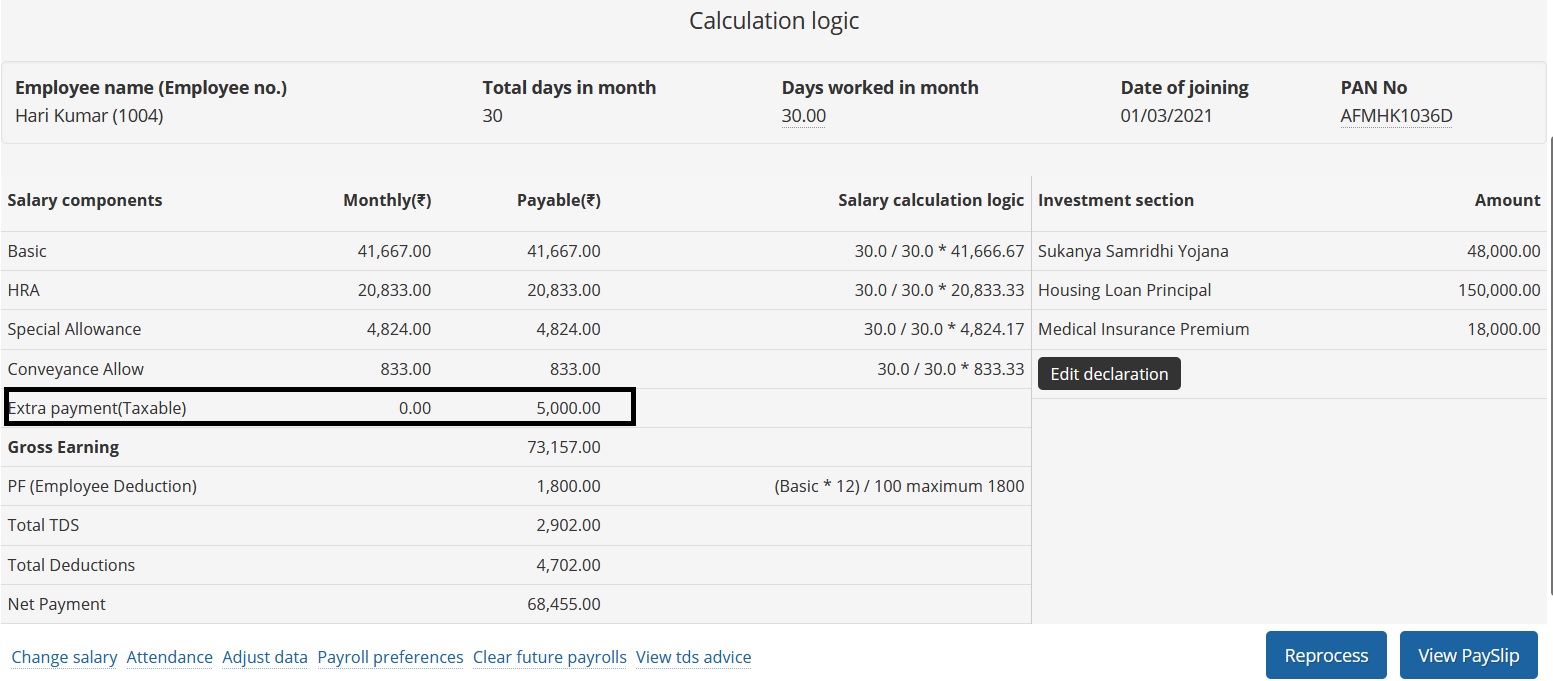
once done click on the reprocess payroll and the payment gets added in the calculation
View tds advice in Empxtrack Payroll Lite:
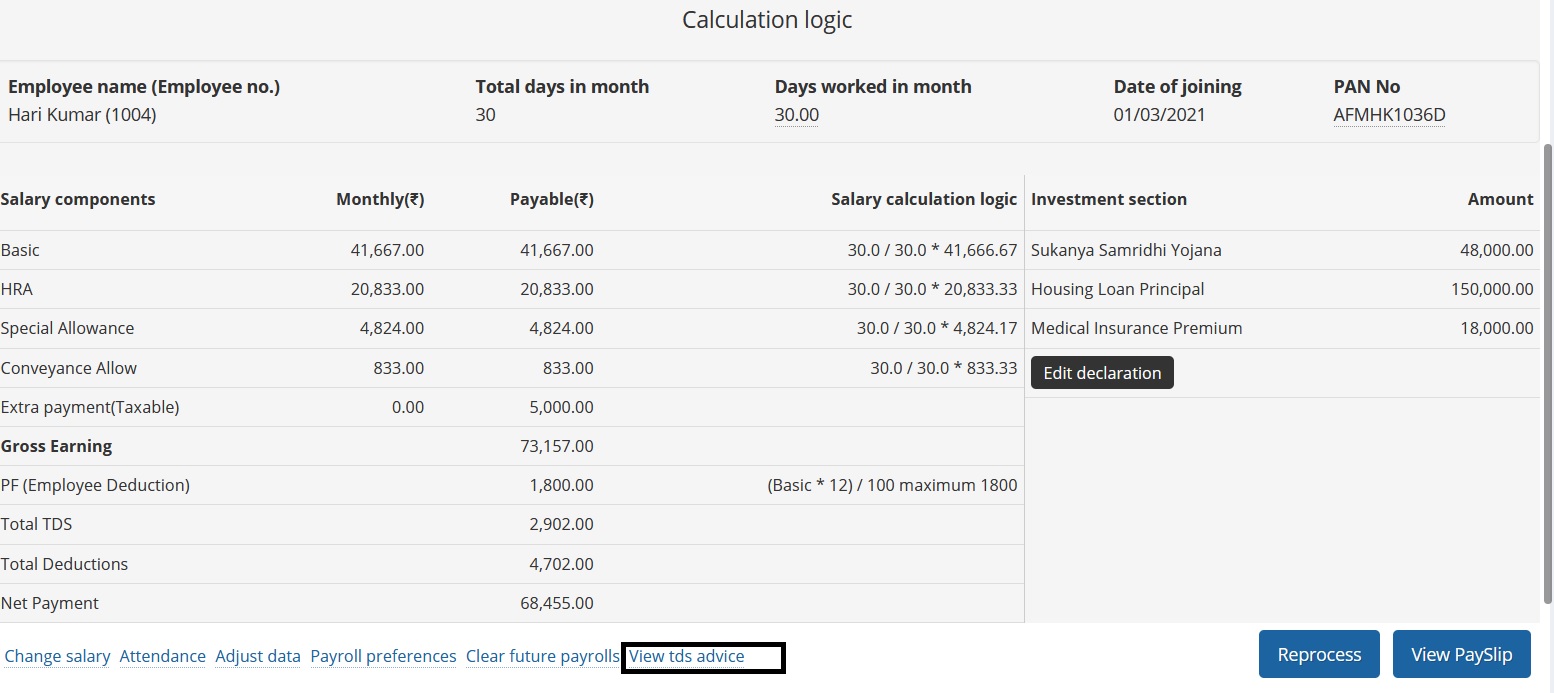
To view tds advice for a financial year click on the view tds advice link in the bottom of the calculation logic section as shown below
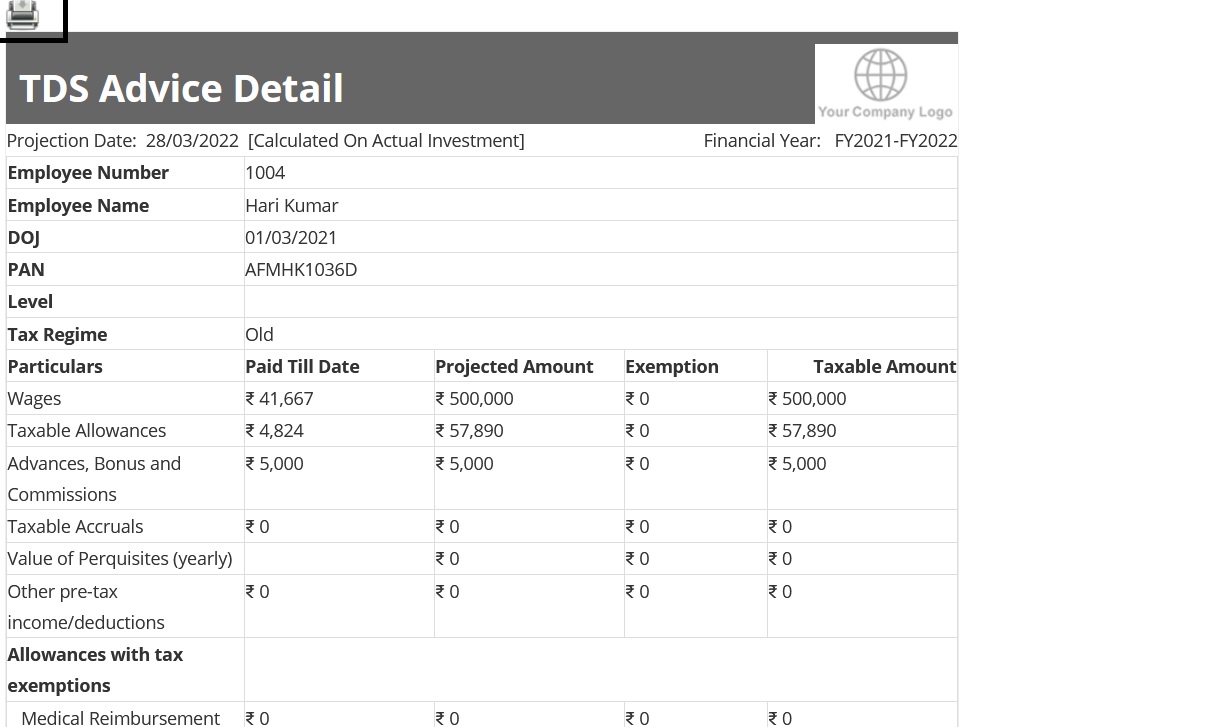
The tds advice can be viewed and downloaded from the system as shown below
View Payslip in Empxtrack Payroll Lite:
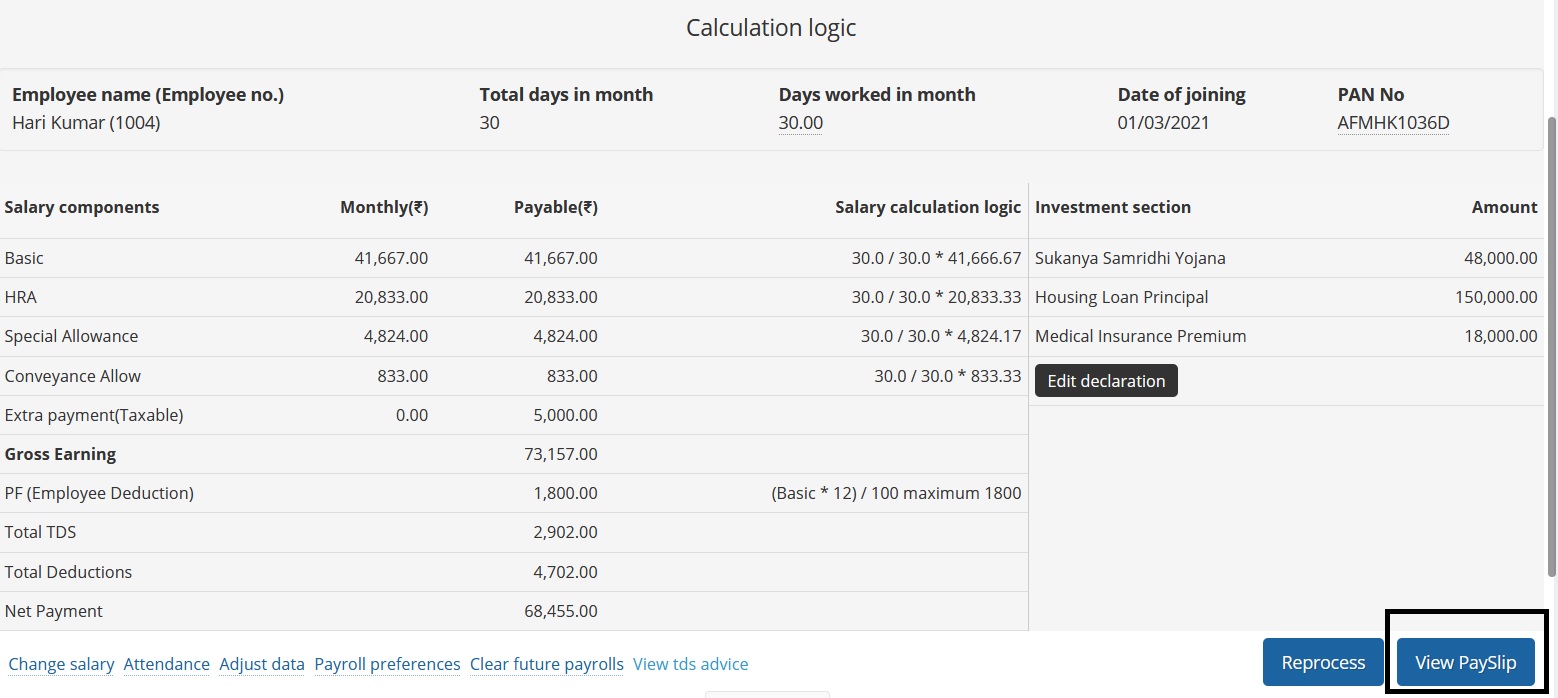
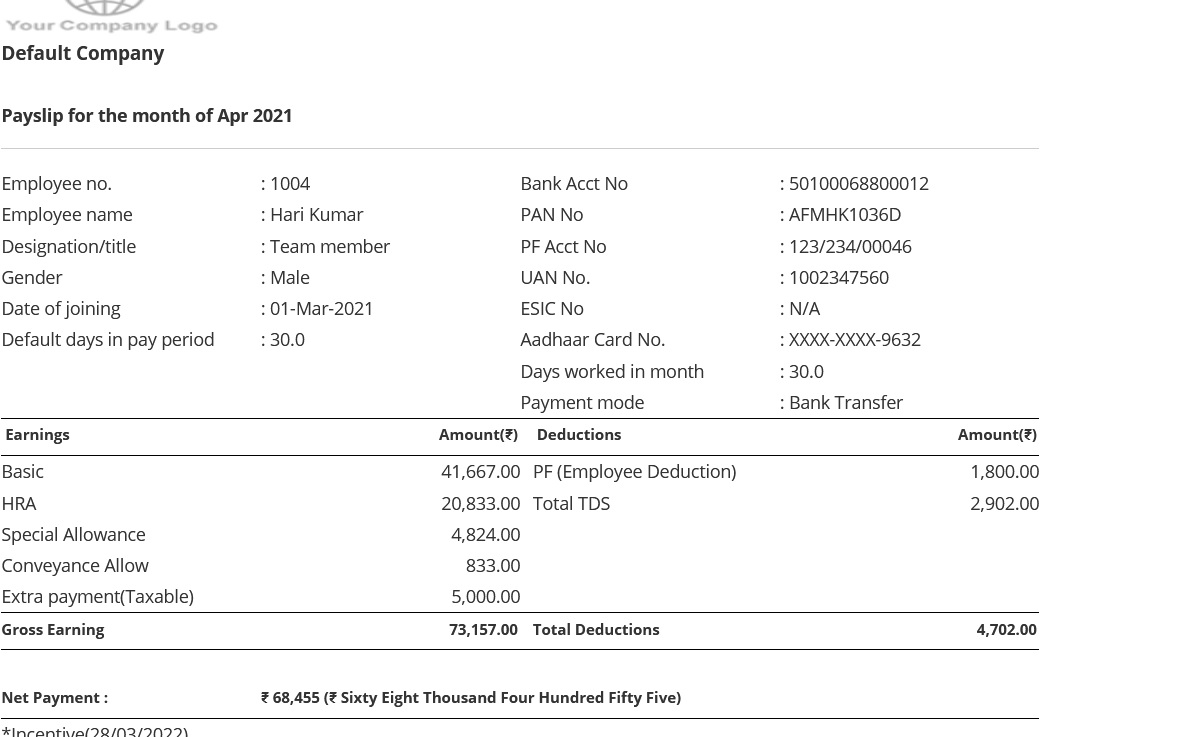
To view payslip of the employee whose payroll has been calculated click on the view payslip button in the bottom of the calculation logic section as shown below
Disburse payroll and send salary slips to the employees:
Once all the payroll calculations, deduction and adjustments are done the next step is to disburse payroll and send salary slips to the employees.
To disburse payroll you need to select all the employees whose payroll has been calculated and click on the link disburse and share payslips as shown below
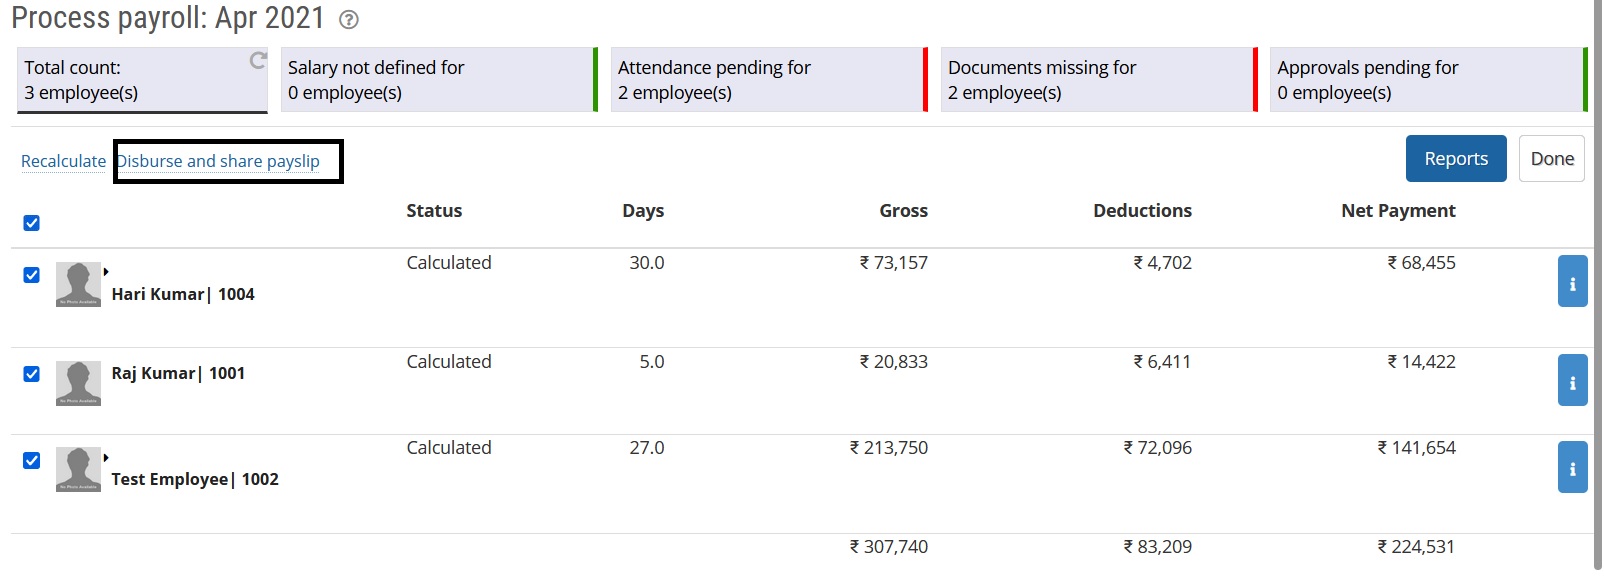
Select the payment option on the next screen as shown below. Once you are done with selection of the payment option click on the “Select payment mode and disburse date” button.
Note: In the process you can also stop payment of employee if for any reason you want to do so. All you need to do is to select stop payment from the payment options drop down.

On the next screen select the disburse date and click on OK button. This will ask for a confirmation and on confirmation the payroll will be disbursed and employee payslip will generate


View and Download Reports:
Payroll reports
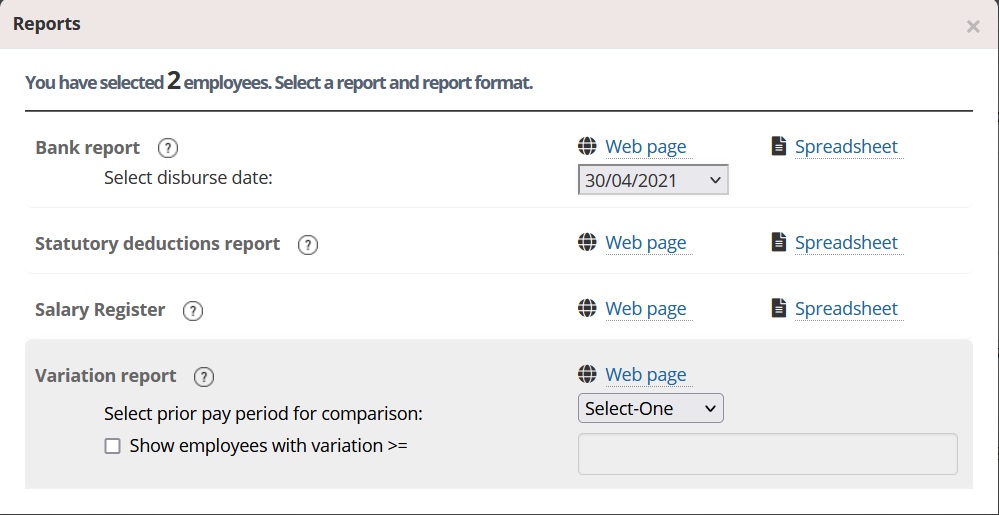
HR Admins can view and download payroll reports like Bank report, Statutory deductions report, Salary register and Salary variation report.
To view and download all of above stated reports select the employees whose payroll is calculated or disbursed as shown below and click on Reports on the payroll dashboard

On the next screen the click on web page option to view report in the browser and spreadsheet option to download the report in excel format
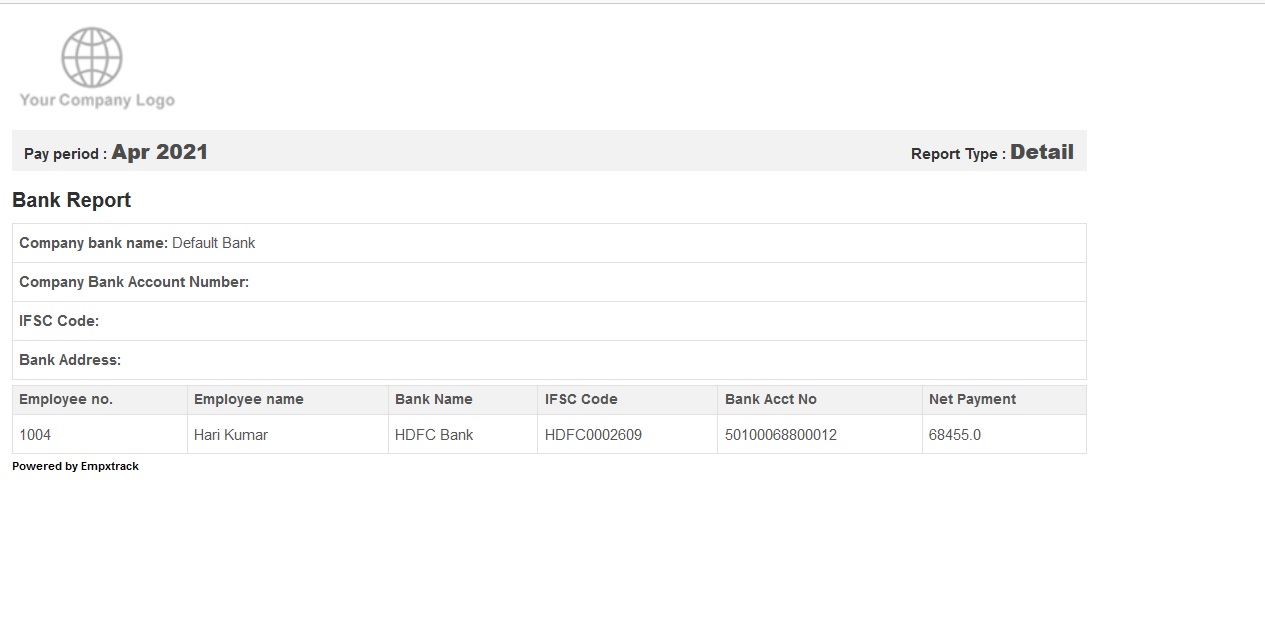
An HTML format of the report in the browser is shown as follows
A downloaded salary register in excel format looks as shown below

View & Download statutory reports:
You can also view and download the statutory reports like Form 16, PF ECR, Form 24Q, PT challan and Form T etc .
To view and download the statutory reports, please click on the “View statutory reports” option on the left hand menu bar as shown below

Generate Payslip for employee:
Click on generate payslip for employee on View statutory reports dashboard

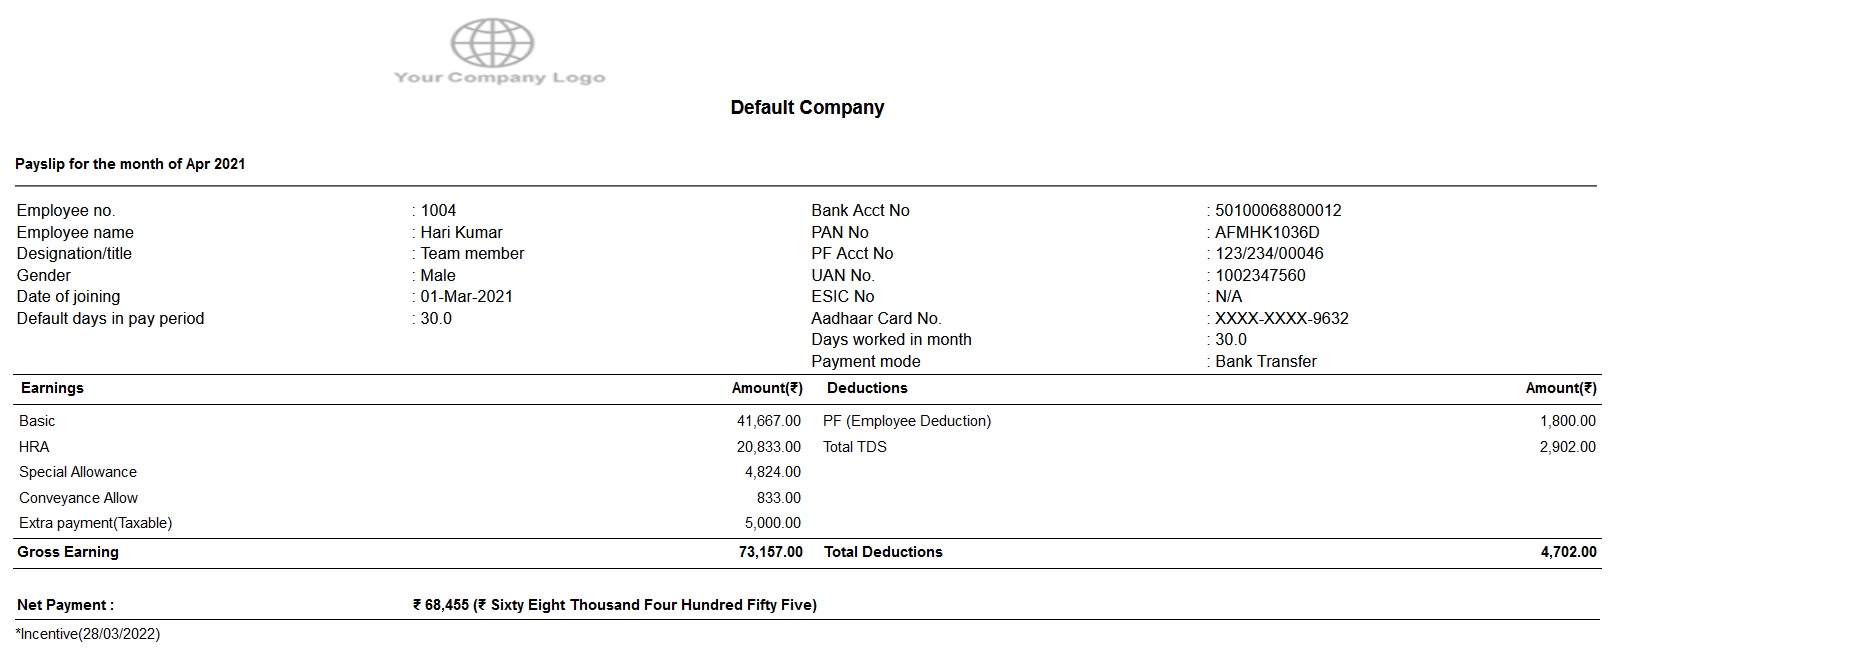
On the next page select the employees, financial period, pay period and click on generate payslip to view pay slip in html format, generate payslip in pdf to download pdf format. You can also send the respective payslip to the selected employees in their e-mail inboxes.

A payslip looks as shown below
View/download Investment declaration
To view download investment declaration click on the Investment declaration for employees link on statutory report dashboard as shown below

On the next page select employee name and financial period appropriately. Once done you can download the report pdf by clicking on download button or can generate the html version of the report clicking on Generate investment Declaration button in the bottom.

The generated html report looks as shown below

View download employee TDS advice
HR admins can view and download TDS advice from the Statutory reports for taxation purposes. To view/download these reports click on View TDS Advice link on the statutory reports dashboard as shown below

On the next screen, select employees, financial period, Tax regime, Investment declaration option appropriately and click on download link to down the report in pdf or generate tds advice button to generate the report in the application in html version.

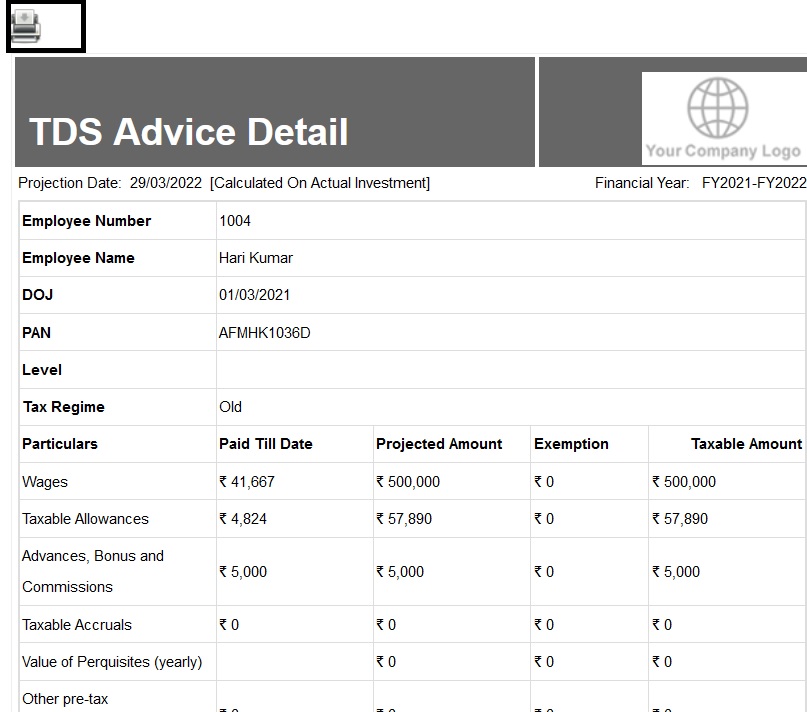
An HTML version of the report is as shown below
Generate Form 16
To generate and download Form 16 click on the Form 16 link on the statutory reports dashboard as shown below.

On the next screen select employees, financial period and company appropriately and generate form 16 button to view Form 16 and generate form16 in pdf button to download form 16 in pdf format.

Generate 24Q
Form 24Q is a statement that an employer needs to submit to the income tax department on quarterly basis. Empxtrack system generates this form for you. It contains the details of the salary paid and tax deducted from the employees by the company.
The system automatically generates the form 24Q in .txt file that you can validate using File Validation Utility (a freely downloadable utility from NSDL website) and after validation, the returns should be submitted to the department.
To generate Form 24Q text file, you need to click on Form 24Q link as sown below

Select the financial period for which you want to generate the Form 24Q from the Financial period drop down.
Select the quarter for which you want to generate the Form 24Q from the Quarters drop down.
Select your company from the Company field and click on Generate Form 24Q button in the bottom

The File Download dialog box appears, as shown below. You can now save the automatically generated Form 24Q text file on your computer.

Download PF ECR
To download PF ECR click on the PF ECR link on the dashboard as shown below

On the next screen, select the financial period and pay period appropriately and click on download PF ECR button. Once downloaded you can save the report in your computer.

For employees:
Employees can view/download payslip, view salary structure, view tds advice, declare investment for the financial period and declare income from other sources.
View/download payslips:
To download payslip log in Empxtrack as the employee and click on salary records in self services section as shown below.

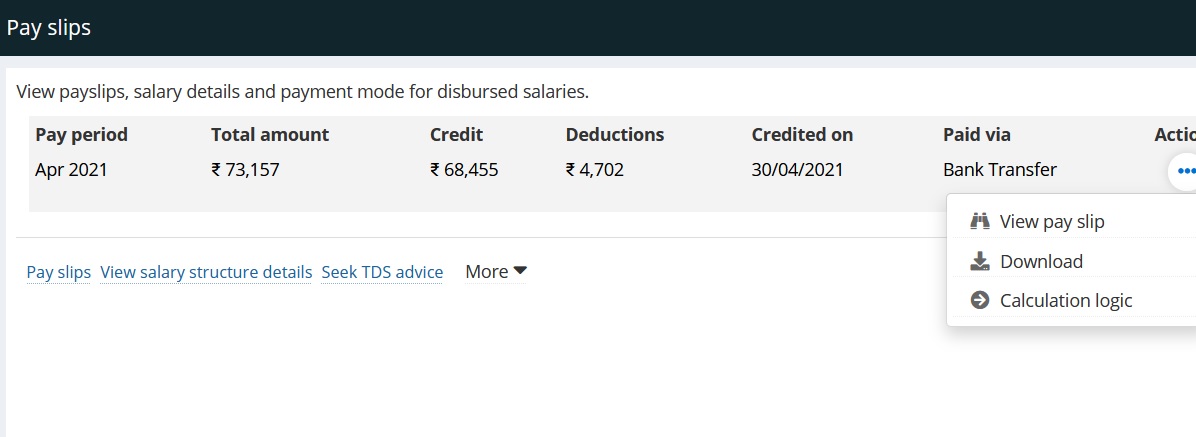
On the next screen click on the three dots icon and choose the option to view salary slip in the browser, download salary slip in pdf format and view the calculation logic as shown below
View salary structure details
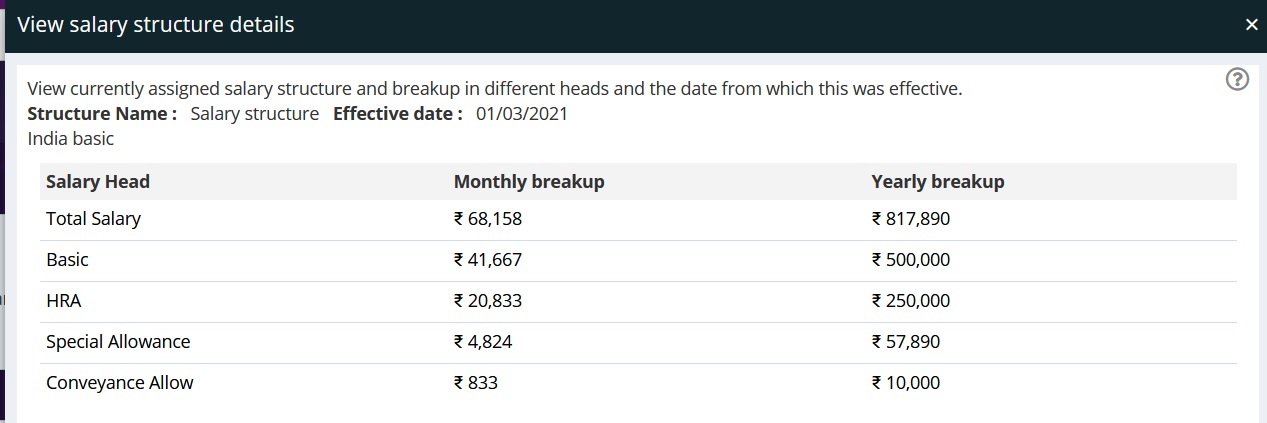
To view salary structure details go to Payslip dashboard as stated above and click on the “View salary structure details” link as shown below

Employees can view their existing salary structure as shown below
Declare investment and submit declaration
To declare investment and submit declaration go to payroll dashboard as stated above and click on the more drop down followed by My declarations option in the drop down

On the next screen you can copy previous year declarations by clicking the “Copy Declaration From Prior FY ” button
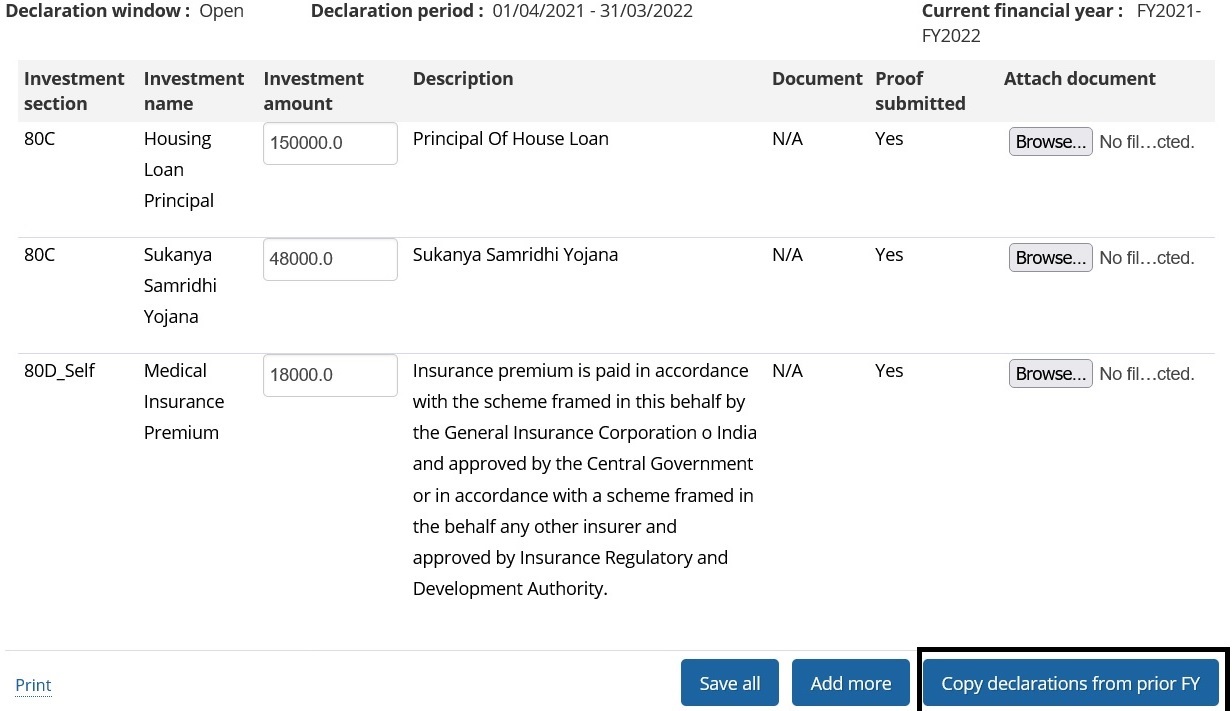
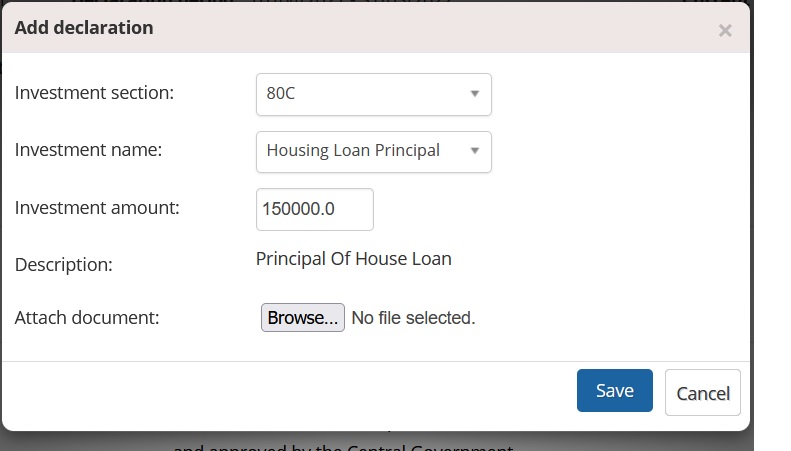
To add new declarations by click on “Add more” button
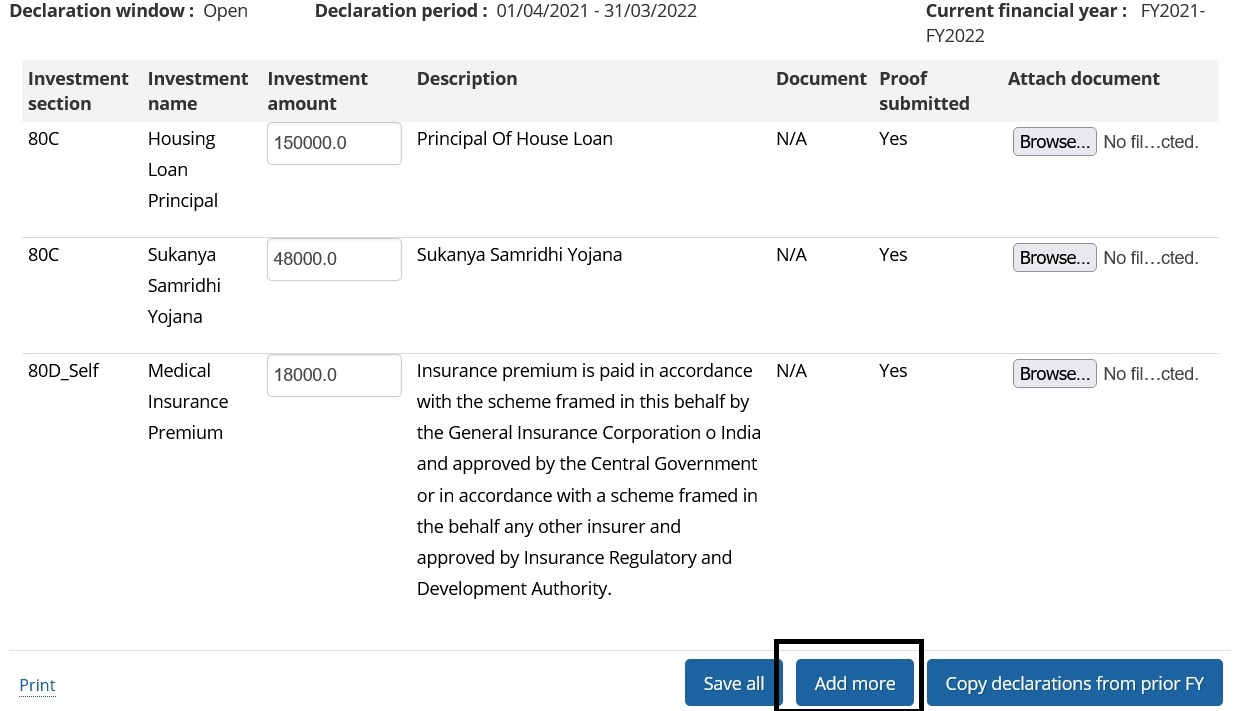
On next screen choose appropriate investment options from the respective drop downs enter the correct amount upload document and click on save
FAQS
What is Empxtrack payroll lite?
Empxtrack has launched the lite version of payroll which helps the HR/Payroll admins to swiftly run the payroll of the employee make changes and adjustments on the go and disburse the payroll.
How can start using payroll lite for my organization?
Post enrollment, you will receive an application setup link with verification code on your registered email id. Once you login to Empxtrack, complete the initial setup of the application in just a few minutes:
- Upload company logo – Upload your company’s logo and answer a few questions.
- Setup Basic Settings – Setup new password and specify the time period.
- Add Employees – Fill in the employee information to create an employee profile.
- Go to payroll page and setup company information and payroll preference
- Run payroll
- Review processed payroll, make adjustments and reprocess the payroll
- Disburse payroll, send salary slips to employees and run reports
How can I view last month payroll?
To view already processed payroll of any month select the month in the drop down in All pay periods on payroll dashboard page and click on go.
How Can I view previous year payroll?
To view previous payroll of any month from previous years, choose the financial period and month on the payroll dashboard . To choose the desired financial period go to financial period and click on the pen icon as shown below.

On the next screen choose the desired financial period as shown below

What are pay periods and how to set modify pay periods?
A pay period is the duration for which you pay a salary. Pay periods are typically Monthly, Fortnightly or Weekly. In India most companies pay salaries on a Monthly basis.
Empxtrack allows automatic generation of pay periods for each financial year once you specify the start date of the first pay period.
Note: Empxtrack Free Payroll offers only Monthly pay periods. Advanced versions of empxtrack allow weekly and biweekly pay periods as well.
How does Empxtrack calculates salary?
Empxtrack Payroll lite uses the following steps while calculating employee salary
| Days worked | Attendance rules and daily hours logged identifies the number of days an employee has worked Holidays, weekends and Leave are counted as paid days. Percentage of Salary to be Paid = Days Worked / Total days in month |
| Out of salary payments | Any out of salary payments (such as commissions, arrears, loan returns etc.) are input by HR |
| Eligible salary | Eligible salary = Percentage of salary to be paid * Employee monthly Salary + Out of salary payments |
| Deductions | Deductions such as ESI, PF, TDS, Professional taxes are identified on the basis of location, investment declarations, and taxation rules |
| Net salary calculations | Eligible salary – Deductions |
What are different challans and statutory reports supported in payroll lite?
Empxtrack Payroll lite offers all the necessary statutory reports that are required for payroll reporting and statutory compliance in India.
ESIC
ESIC is Employees state insurance corporation. The benefits given by the ESIC are in line with the conventions of Conventions of International Labor organization. It includes benefits like medical, sickness, disablement, benefits, etc.
An employer deducts ESIC and PF contribution from employee’s income every month to meet statutory compliance.
Each of these social security schemes has a specific percentage of contribution from employees and employer.
Note: Steps To generate ESIC are given in help above.
Form 24Q
Each employer is responsible to submit Form 24Q, a quarterly statement, to the income tax department. Form 24Q is used for preparing eTDS returns for TDS deducted on salary.
This form is expected to be submitted on a quarterly basis with complete details on salaries paid to the employees and their tax deduction details for each month.
Note: Steps To generate 24Q are given in help above.
Form 16
Form 16 is generated to certify details regarding an employee’s salary earned throughout the year and the deductions made. The deductions are paid to the government by the employer. Tax payers ought to use Form 16 for filing tax returns at the end of the financial year.
Note: Steps To generate Form 16 are given in help above.
How Can I set up ESI PF elligibility?
ESIC Deduction Rule: If an employer has more than 10 employees, the company must deduct ESIC from their employees’ salary based on the ESIC salary rules explained below. Deduction of ESIC is not mandatory for an employer with less than 10 employees.
Exception – Employers in Chandigarh and Maharashtra should have a minimum count of 20 employees instead of 10.
An employee having a monthly gross salary greater than and equal to Rs 21,000 is eligible for ESIC. Ideally, the ESIC deduction from employee salary is made on this formula Gross salary x 0.75/ 100. Employer contribution is Gross x 3.25/ 100.
PF Deduction Rule: If an employer has more than 10 employees, the company must deduct PF from their employees’ salary. Employee and employer contribution for provident fund is 12% of wages.
You can configure Company information to enable / disable PF and ESIC. Furthermore, Payroll >> employee preferences allows you to override ESIC and PF rules for individual employees.
Note: Please view help above to set up company information and payroll preference
How can I upgrade to paid version of Empxtrack payroll software?
To upgrade to paid version of the application log on the application as HR manager and click on Upgrade on the homepage as shown below

On the upgrade application page, look for India payroll and click on Add to cart button as shown below

In the popup fill the number of employees for which you want to purchase the application and click on Submit button. This will add the item in cart.

Click on cart icon and access the checkout page

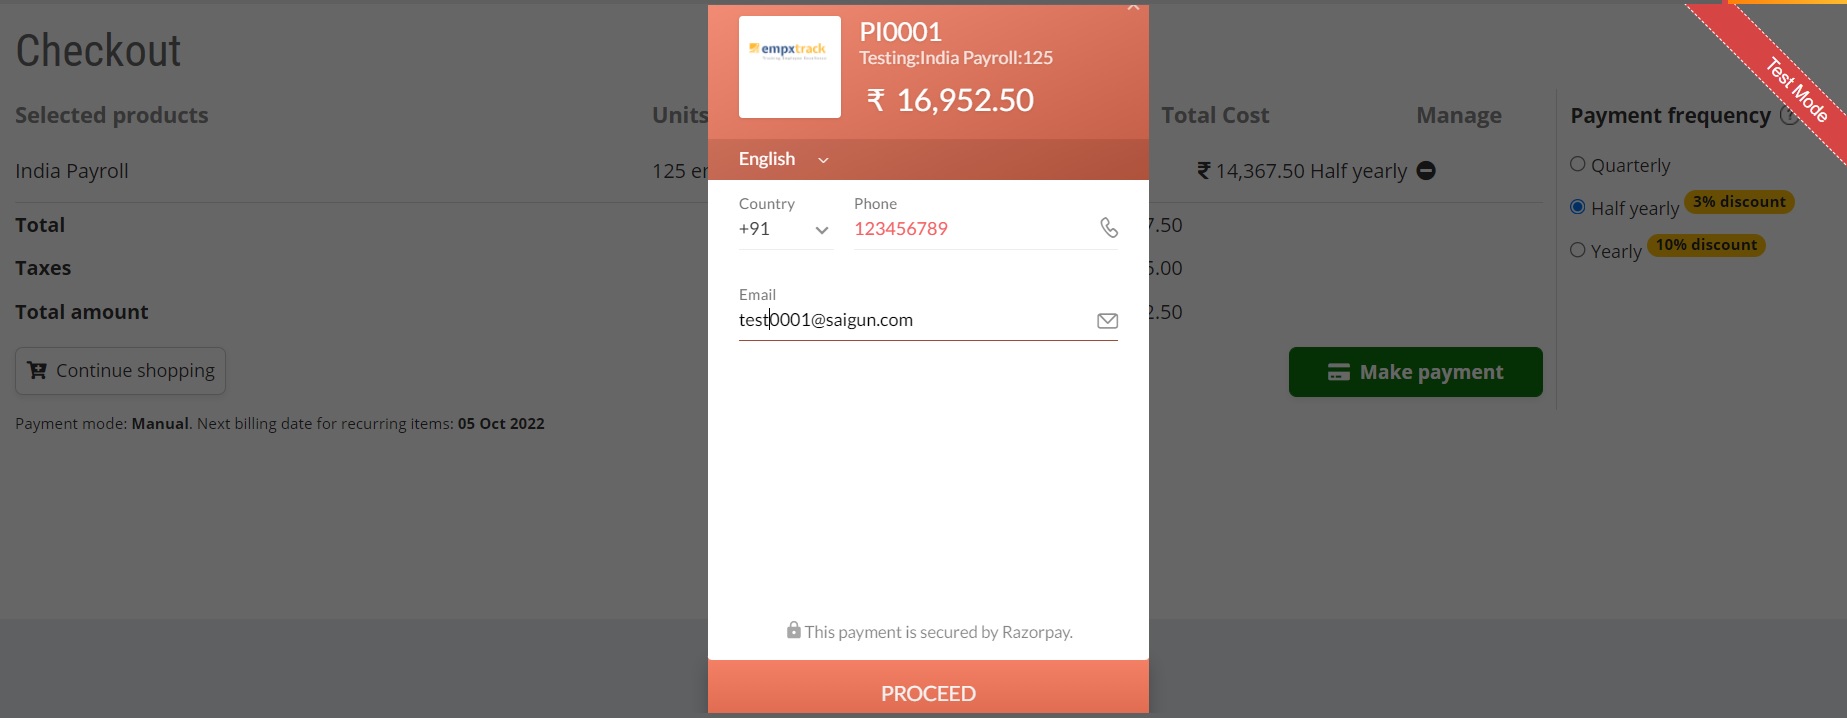
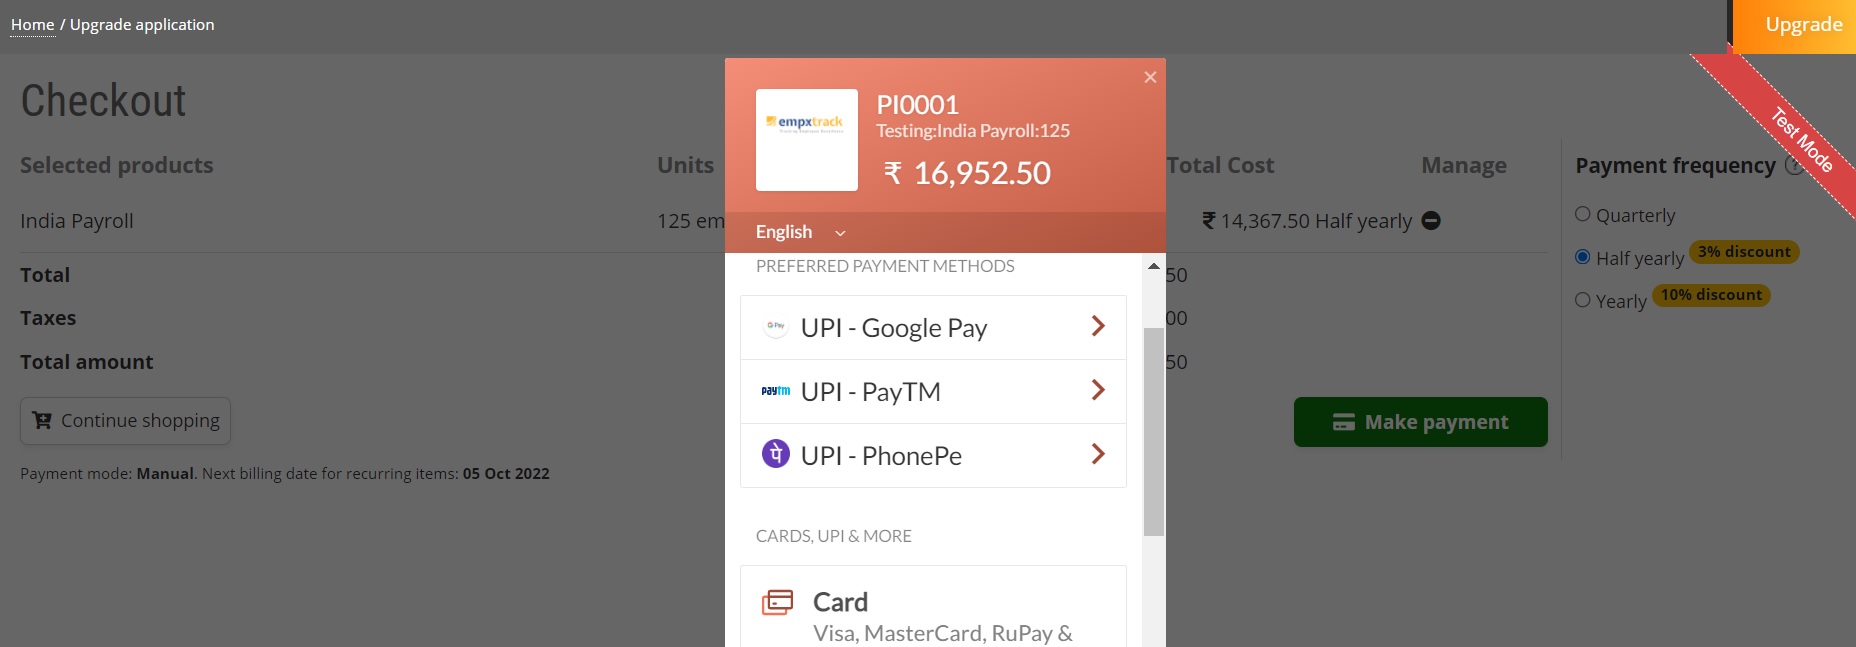
On the check out page, select the payment frequency option and click on make payment.

On the next screen enter you e-mail and phone number information and click on proceed
Select your proffered payment option and make the payment
Click on the following links to know more about them:
FAQs (Frequently Asked Questions)
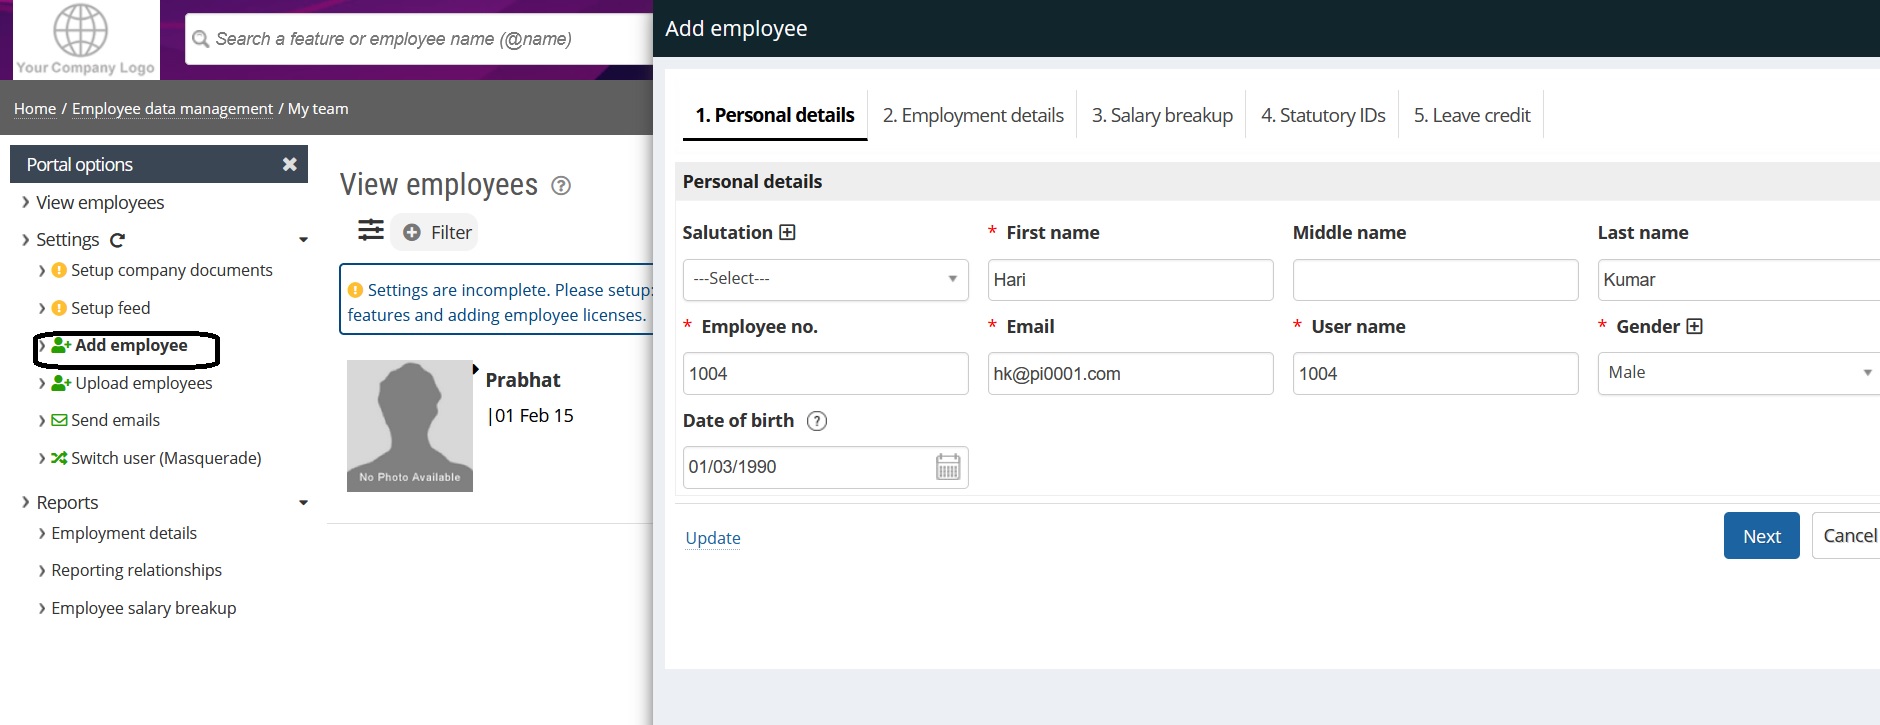 Figure:1

