Skip to content
Navigation in Empxtrack help page gives a quick overview of how to navigate within the product and explore its functionalities.
There are various areas in Empxtrack that can assist users to complete their tasks quickly. Navigation in Empxtrack is based on the Tabs, Main menu, Search bar, Icon bar, Filter, Employee menu, Quick access shortcuts, Product configurations, Employee preferences, Help menu, Widget menu and Table menu.
Note: The navigation in empxtrack functionality has been explained of Empxtrack enterprise product. Some of the functionality may not be available in your free trial product. Upgrade your free trial to avail these features.
Widgets

Figure-1
- The Application Dashboards homepage displays multiple widgets based on the product that you are using.
- Click on each widget to open it in full page and use that functionality.
- The number of widgets may depend on the Empxtrack product version.
Main Menu

Figure-2
- Empxtrack divides the full functionality into 5 distinct areas: Performance, Employee data management, Development, Talent management and Product Configuration.
- This may or may not be available depending on your product version.
- Clicking on any one of these displays dashboards related to the functionality in each area.
Icon Bar
Figure-3
Search Bar
- Empxtrack provides a Search feature allowing users to quickly access product functionalities.
- Type any keyword or phrase related to the functionality that you want to access and hit the search icon. The relevant options appear and you can click on any of them to perform a specific task.
Quick Access Icons
- This contains many icons with links to functionality that are used often.
- Icons include TODOs, Notifications, Communicate, Time-based activities, Help and Videos, and Role and features menu and many other icons based on the version purchased by you.
Role Menu
- Clicking on the role (such as HR Manager) opens the role menu where you can view all the roles assigned to you and functionality associated with each role.
- Changing your role may change the menu options available.
- Once you click on one of the menu items, your role changes and the appropriate page is selected.
- Role once selected remains the same till it is changed explicitly.
Filter

Figure-4
- Some pages may support filters such that you can change time periods, financial year, selecting a sub-group of employees or selection of a specific employee.
- Filters may change based on the page and its filter requirements.
- Filter once set remains the same till it is reset or changed.
Employee Menu
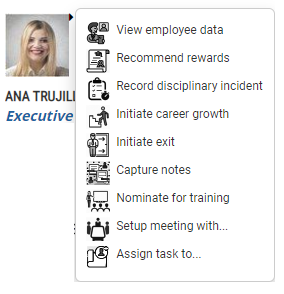
Figure-5
- Employees have a menu that is available to HR and Managers. Based on the functionality available, the user can access the functionality associated with the employee.
- The menu items depend on the functionality enabled in the product.
Quick Access Shortcuts

Figure-6
- Figure-6 shows the multiple options given in Empxtrack Payroll product
- Different Empxtrack modules like Payroll, Appraisal, Portal, Exit, 360 etc may have many different options. These are displayed in the Quick access shortcuts
Product Configurations
As HR, you have access to all configurations through the Product Configurations icon ![]() available to you on the Homepage. Click on the icon to view multiple configuration options available to the HR Admin.
available to you on the Homepage. Click on the icon to view multiple configuration options available to the HR Admin.

Figure-7
Alternatively, you can click on the Roles and features menu given on the top icon bar and access the Product configurations page from there.

Figure-8
Note: The above image is of Empxtrack Enterprise product. The configuration options on this page may vary depending upon the product that you are using.
Employee Preferences
- You can update your personal preferences such as Language, password, style sheet by clicking on the menu next to your photograph.
Help Menu

Figure-9
- Most pages have a title and a question mark next to the title. Clicking on the question mark icon displays a page specific help.
- The links at the bottom (if available) will take you to empxtrack full page help.
Widget Menu
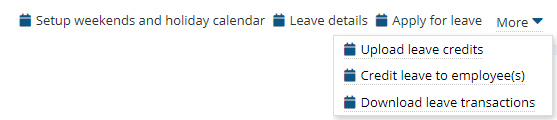
Figure-10
- Widgets contain sub-menus that contain sub-functionality about each widget
- The above displays sub-menus for Leave widget
Table Menu
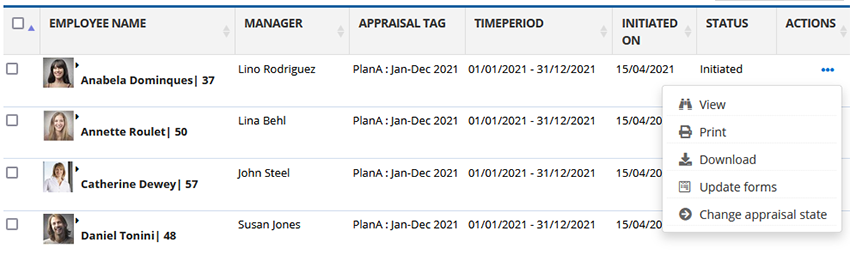
Figure-11
- Hovering on a row in any table displays menu options with icons. This indicates the activities that can be performed on a specific row.
- Hover on an icon and a label will display and help explain the functionality being offered.
- Clicking on a row would run the first function automatically.
Suggested links